Halloween is a time for fun, scares, and creativity. One of the best ways to get into the Halloween spirit is by decorating your porch.
Decorating your porch can make your home look festive and inviting. It sets the mood for trick-or-treaters and guests.
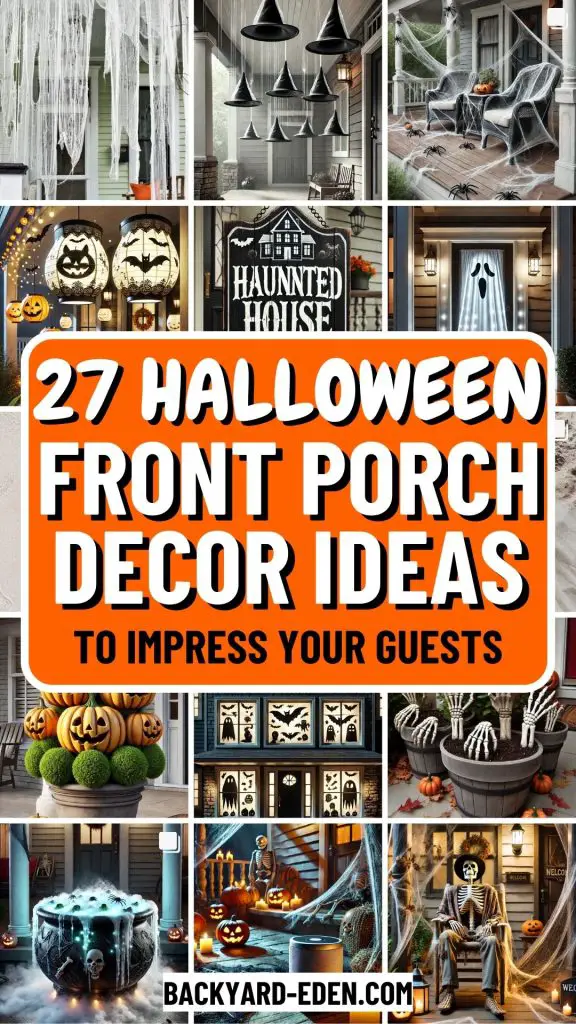
In this blog post, you’ll find 27 different ideas for Halloween porch decor.
These ideas range from spooky to fun, ensuring something for everyone.
Whether you like skeletons, pumpkins, or creepy crawlies, there’s an idea here for you.
Each idea comes with a reason why you should try it, a list of materials, and simple step-by-step instructions.
We will also answer common questions you might have. By the end, your porch will be the talk of the neighborhood!
Idea 1: Spooky Skeleton Welcome
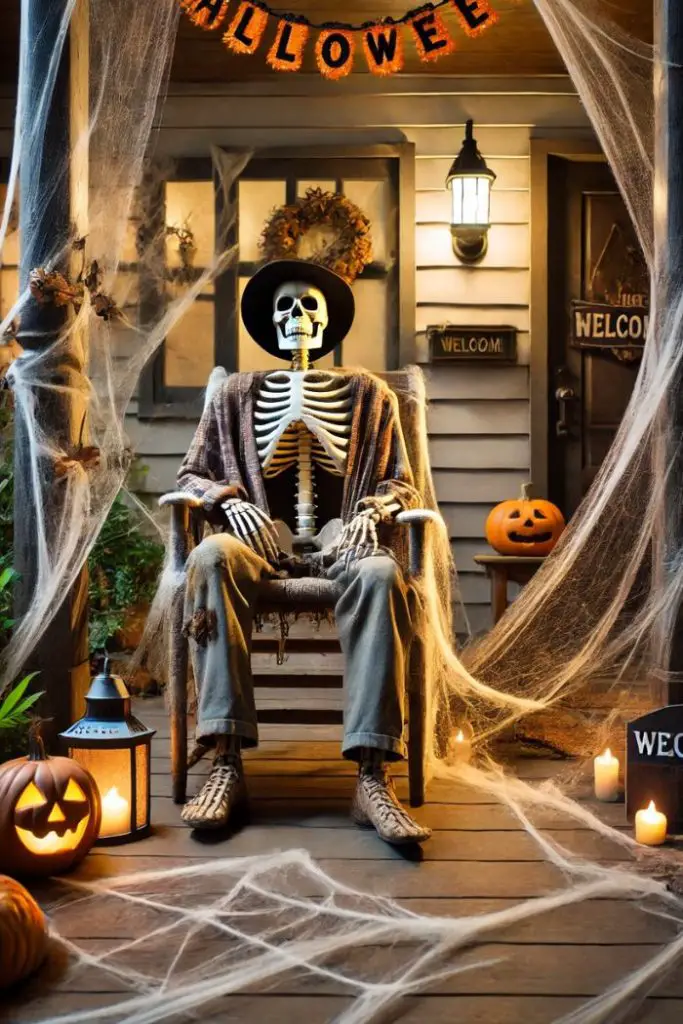
Why Do This Idea?: A spooky skeleton welcome creates a creepy yet fun entrance for trick-or-treaters. It sets the Halloween mood right at your doorstep and can be a great conversation starter.
Materials List:
- Life-sized skeleton
- Old clothes (like a shirt and pants)
- Fake cobwebs
- A chair
- A hat
Step-by-Step Instructions:
- Dress the Skeleton: Put the old clothes on the life-sized skeleton. Make sure the clothes are a bit worn or tattered for a spooky effect.
- Position the Skeleton: Place the skeleton on the chair. Arrange its limbs to make it look natural, like it’s sitting and waiting for guests.
- Add a Hat: Put a hat on the skeleton’s head. This adds a bit of whimsy and character.
- Drape Cobwebs: Drape fake cobwebs over the skeleton and the chair. Make sure they look natural and slightly messy.
Where Can I Buy a Life-Sized Skeleton?
You can find life-sized skeletons at most Halloween stores during the fall season. Big-box retailers like Walmart and Target also stock them. Additionally, online marketplaces like Amazon offer a variety of options. Shopping early can help you find the best deals and avoid last-minute rushes.
How to Make the Skeleton Look More Realistic?
To make the skeleton look more realistic, consider adding small details. A creepy mask or glowing eyes can enhance its spookiness. You can also paint the skeleton with a light wash of dark paint to give it an aged appearance. Adding accessories like a cane or a spooky sign can also add to the effect.
Idea 2: Glowing Jack-O’-Lantern Pathway
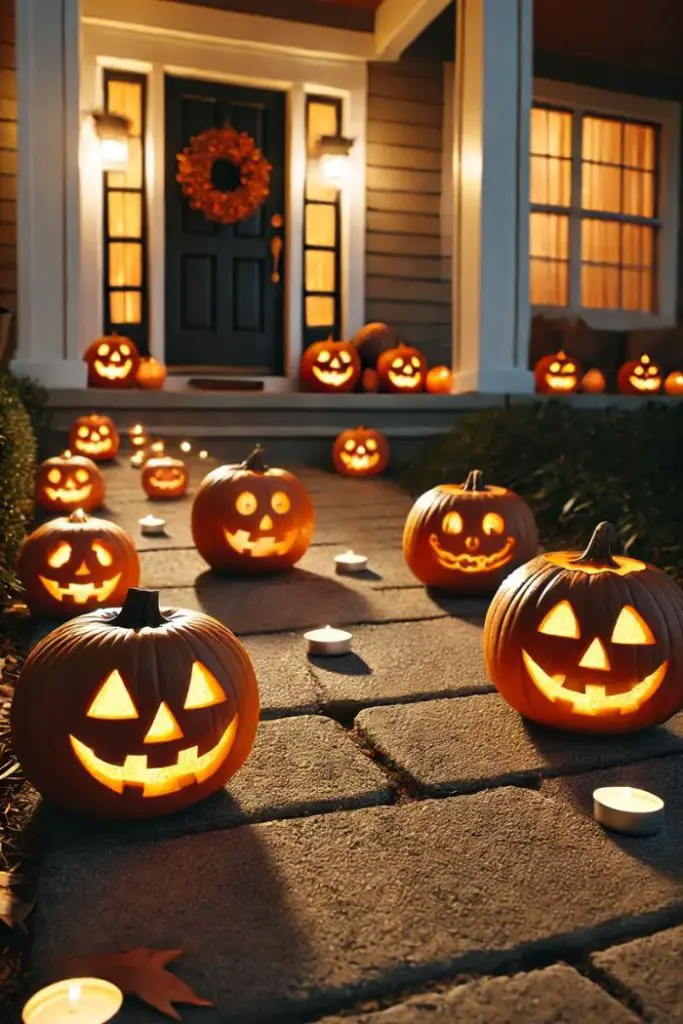
Why Do This Idea?: A glowing jack-o’-lantern pathway lights up your walkway, creating a magical and spooky atmosphere. It guides visitors to your door and adds a festive touch to your Halloween decorations.
Materials List:
- Several pumpkins
- Tea lights or battery-operated candles
- Carving tools
Step-by-Step Instructions:
- Carve the Pumpkins: Carve different designs into each pumpkin. You can go for classic faces, spooky scenes, or creative patterns.
- Add Lights: Place tea lights or battery-operated candles inside the pumpkins. Battery-operated candles are safer and last longer.
- Arrange the Pumpkins: Arrange the pumpkins along the walkway to your porch. Space them evenly to create a well-lit path.
How to Safely Carve a Pumpkin?
To safely carve a pumpkin, use tools specifically designed for pumpkin carving. These tools are safer than kitchen knives and easier to handle. Start by cutting a lid at the top of the pumpkin and scooping out the insides. Draw your design on the pumpkin with a marker before you start carving. Always carve away from yourself and take your time to avoid accidents.
Can I Use Artificial Pumpkins?
Yes, you can use artificial pumpkins for a longer-lasting and reusable decoration. Artificial pumpkins are available in craft stores and online. They come in various sizes and are often made of foam or plastic. You can carve them like real pumpkins or buy pre-lit versions. Using artificial pumpkins can save time and effort in future Halloween seasons.
Idea 3: Haunted Wreath
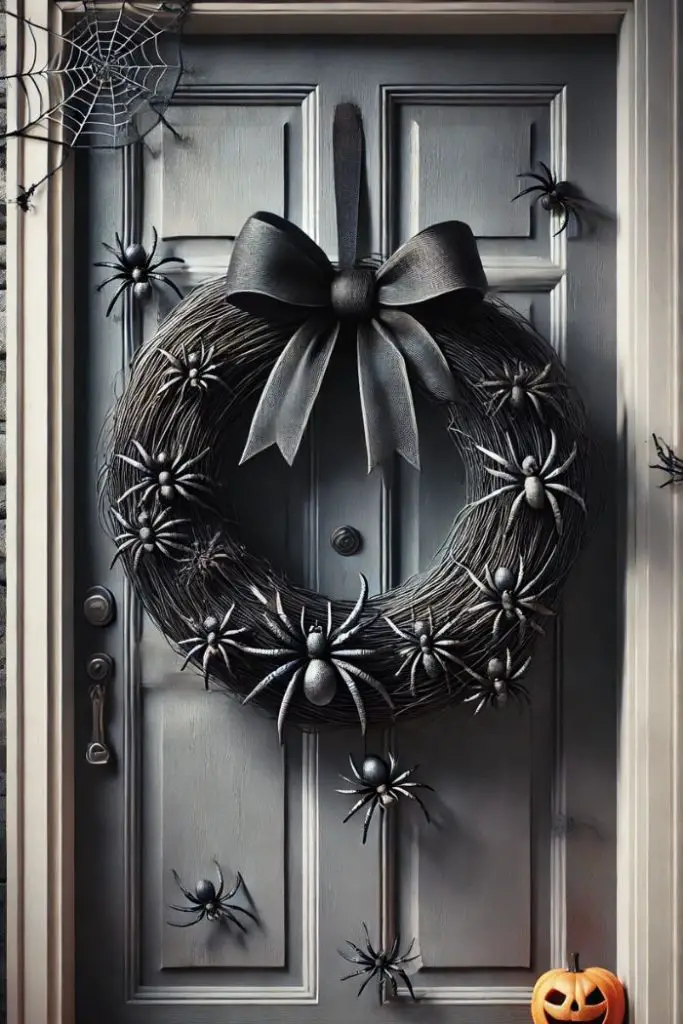
Why Do This Idea?: A haunted wreath adds a spooky touch to your front door. It’s a simple yet effective way to make your home look ready for Halloween.
Materials List:
- Wreath base
- Black spray paint
- Fake spiders
- Black ribbon
- Hot glue gun
Step-by-Step Instructions:
- Spray Paint the Wreath: Spray paint the wreath base black. Ensure you cover it completely and let it dry.
- Attach Spiders: Use a hot glue gun to attach fake spiders to the wreath. Place them randomly to create a natural look.
- Tie a Ribbon: Tie a black ribbon at the top of the wreath. This adds a finishing touch and makes it easy to hang.
- Hang the Wreath: Hang the wreath on your front door using a wreath hanger or a hook.
How to Make the Wreath Last Longer?
To make the wreath last longer, use weather-resistant materials. Spray the finished wreath with a clear sealant to protect it from rain and sun. Store the wreath in a cool, dry place when not in use. Using artificial foliage and decorations also helps maintain its look for several years.
Can I Use Real Foliage Instead of Fake?
Yes, you can use real foliage, but it may not last as long as artificial materials. Fresh foliage can add a natural and authentic look to your wreath. However, it might dry out or wilt over time, especially in harsh weather conditions. To prolong its life, mist the foliage with water and avoid direct sunlight. You can also mix real and fake elements for a balanced approach.
Idea 4: Eerie Eyeball Bushes
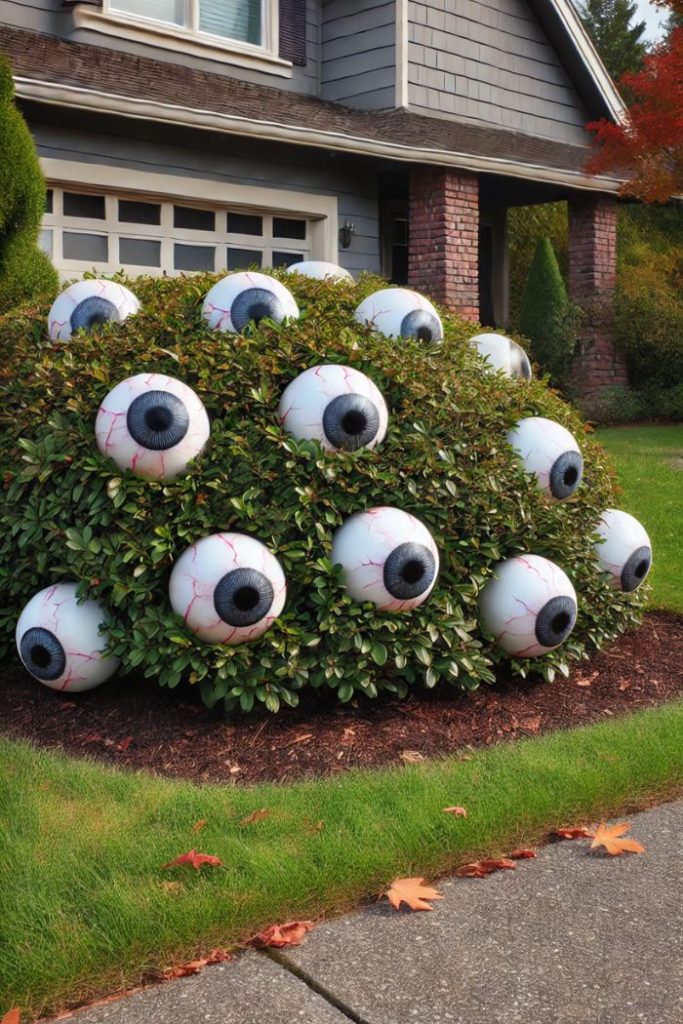
Why Do This Idea?: Eerie eyeball bushes make your garden look alive and spooky. They create the illusion that something is watching your visitors.
Materials List:
- Balls
- Acrylic paint
- Black markers
- Glue
Step-by-Step Instructions:
- Paint the Balls: Paint the balls white if they aren’t already white. Let them dry completely.
- Add Irises: Use acrylic paint to add colorful irises to the balls. You can use different colors for a more interesting look.
- Draw Pupils: Draw pupils in the center of the irises with black markers. Make sure they are slightly off-center to give a natural look.
- Attach Eyeballs: Glue the eyeballs onto the bushes in your front yard. Position them at various heights and angles to create a creepy effect.
How to Make the Paint Waterproof?
To make the paint waterproof, use a clear waterproof sealant spray. Once the paint is dry, spray the balls with the sealant. This will protect the paint from rain and dew. Make sure to let the sealant dry completely before placing the eyeballs in your bushes. You can find waterproof sealant sprays at most craft stores or online.
What Other Materials Can I Use for Eyeballs?
You can use other materials like Styrofoam balls or plastic ornaments for eyeballs. Styrofoam balls are lightweight and easy to paint, while plastic ornaments can be more durable. Both can be found in craft stores. You can also use glow-in-the-dark paint to make the eyeballs even creepier at night. Experiment with different materials to see what works best for your display.
Idea 5: Creepy Crawly Doorway
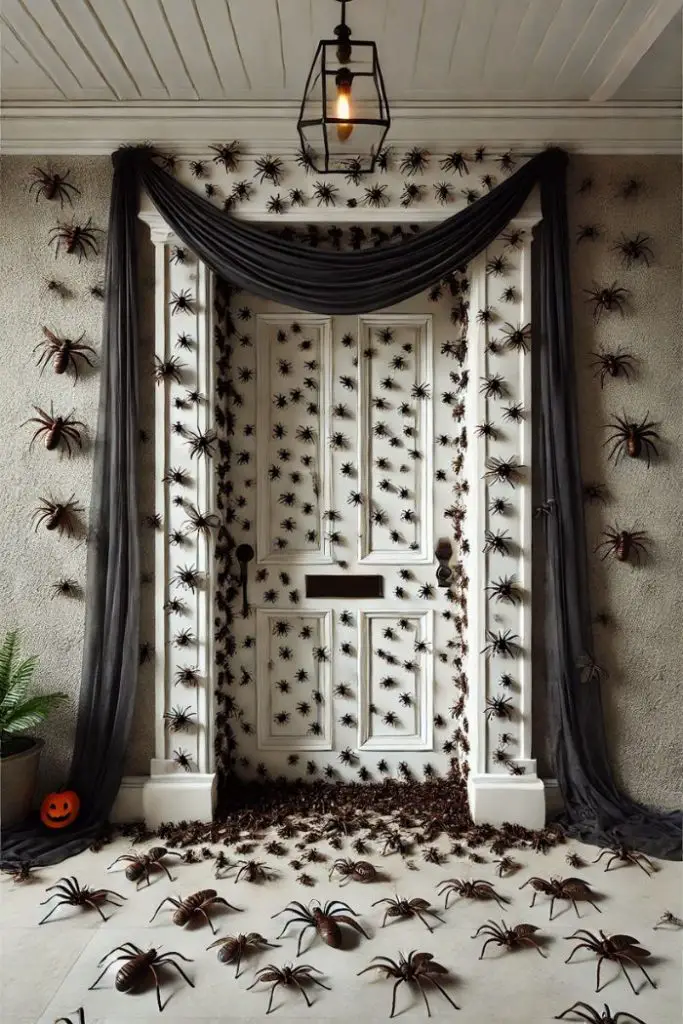
Why Do This Idea?: A creepy crawly doorway creates an unsettling entrance that can give your guests a fright. It’s a simple way to add a spooky element to your porch decor.
Materials List:
- Plastic insects (like spiders, ants, and beetles)
- Double-sided tape
- Black crepe paper
Step-by-Step Instructions:
- Attach Insects: Use double-sided tape to attach plastic insects around the doorway. Place them randomly to create a natural and creepy effect.
- Drape Crepe Paper: Drape black crepe paper around the door frame. Let it hang down in strips to add to the spooky atmosphere.
- Position Insects on Crepe Paper: Attach a few plastic insects onto the crepe paper strips for added effect.
How to Keep the Decorations From Falling Off?
To keep the decorations from falling off, use strong double-sided tape or adhesive putty. Ensure the surface is clean and dry before applying the tape. For added security, you can use small nails or tacks to secure the decorations. If you’re using crepe paper, avoid placing it in areas where it might get wet or blown away by strong winds. Regularly check and adjust the decorations to keep them in place.
Where to Find Realistic Plastic Insects?
Realistic plastic insects can be found at most craft and Halloween stores. You can also find a wide variety online, including detailed and lifelike options. Look for sets that include different types of insects to add variety. Some party supply stores also carry them, especially around Halloween. Compare different options to find the most realistic and durable ones.
Idea 6: Witch’s Broomstick Welcome
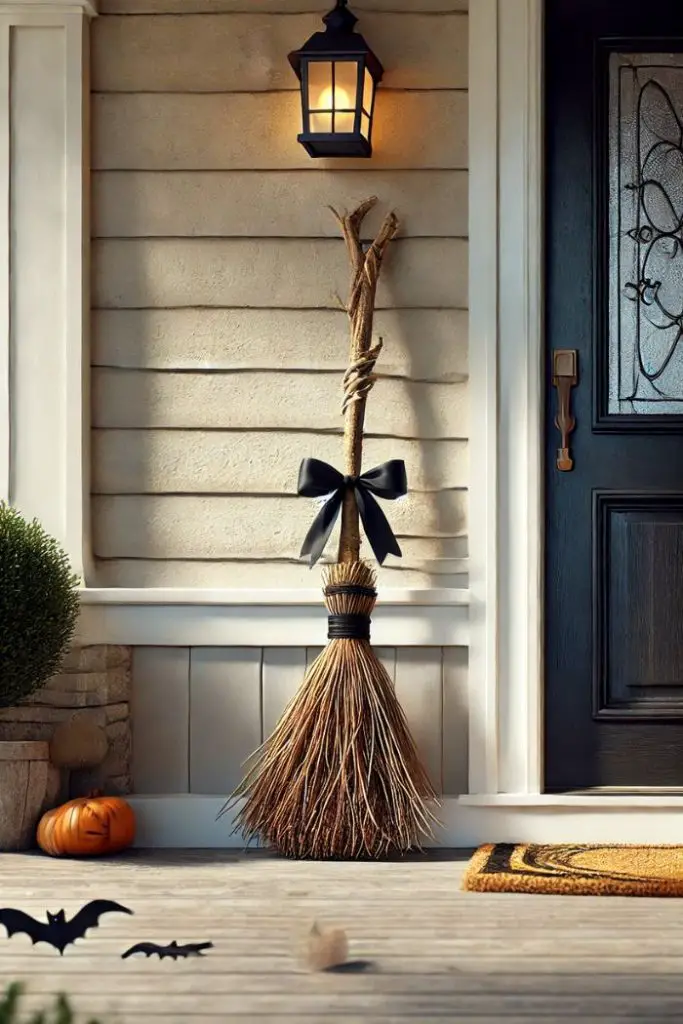
Why Do This Idea?: A witch’s broomstick welcome adds a whimsical yet spooky touch to your porch. It’s an easy decoration that sets the Halloween mood.
Materials List:
- Broomstick (wooden or plastic)
- Straw or twigs
- Black ribbon
- Hot glue gun
Step-by-Step Instructions:
- Create the Broom: Attach straw or twigs to the bottom of the broomstick using a hot glue gun. Make sure the straw or twigs fan out to look like a broom.
- Wrap the Handle: Wrap a black ribbon around the handle of the broomstick for a finishing touch. Secure it with glue.
- Position the Broom: Lean the broomstick against the wall near your door or place it in a corner of your porch.
How to Make the Broom Last Longer?
To make the broom last longer, use weather-resistant materials. Choose a broomstick that can withstand the elements, such as treated wood or plastic. Secure the straw or twigs tightly to ensure they don’t fall apart. Store the broom indoors when not in use to protect it from rain and wind. If you want to use natural materials, consider spraying them with a clear sealant for added durability.
Where to Buy a Witch’s Broomstick?
You can buy a witch’s broomstick at most Halloween stores during the fall season. Party supply stores and big-box retailers often carry them as well. Online marketplaces like Amazon offer a variety of options, including pre-made brooms and kits to make your own. If you prefer a more authentic look, check out local craft stores for materials to DIY your broomstick.
Idea 7: Ghostly Hanging Lanterns
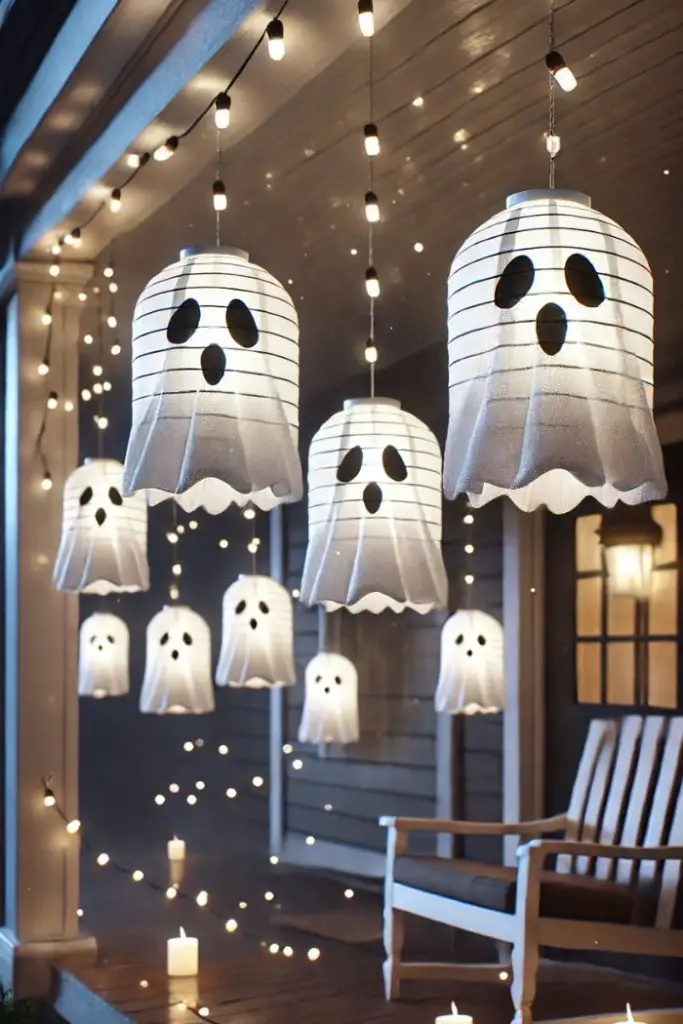
Why Do This Idea?: Ghostly hanging lanterns add a spooky, ethereal glow to your porch. They create a haunting atmosphere that’s perfect for Halloween night.
Materials List:
- White paper lanterns
- Black construction paper
- Glue or tape
- Fishing line or string
- Battery-operated tea lights
Step-by-Step Instructions:
- Prepare the Lanterns: Assemble the white paper lanterns according to the instructions.
- Create Faces: Cut out eyes and mouth shapes from the black construction paper. You can make different facial expressions for variety.
- Attach Faces: Glue or tape the eyes and mouths onto the lanterns to create ghost faces.
- Insert Lights: Place a battery-operated tea light inside each lantern.
- Hang the Lanterns: Use fishing line or string to hang the lanterns from your porch ceiling or tree branches. Make sure they hang at different heights for a more dynamic look.
How to Secure Lanterns in Windy Conditions?
To secure lanterns in windy conditions, use sturdy string or fishing line and tie them tightly. You can also add small weights inside the lanterns to keep them from swaying too much. Ensure the lanterns are hung in a sheltered area if possible. Regularly check the lanterns to ensure they are still secure and adjust as needed.
Where to Find White Paper Lanterns?
White paper lanterns can be found at most party supply stores and craft stores. They are also widely available online through retailers like Amazon and eBay. Look for lanterns specifically designed for outdoor use if you plan to hang them outside. Some stores may offer bulk packs, which can be more cost-effective if you need multiple lanterns.
Idea 8: Pumpkin Topiary
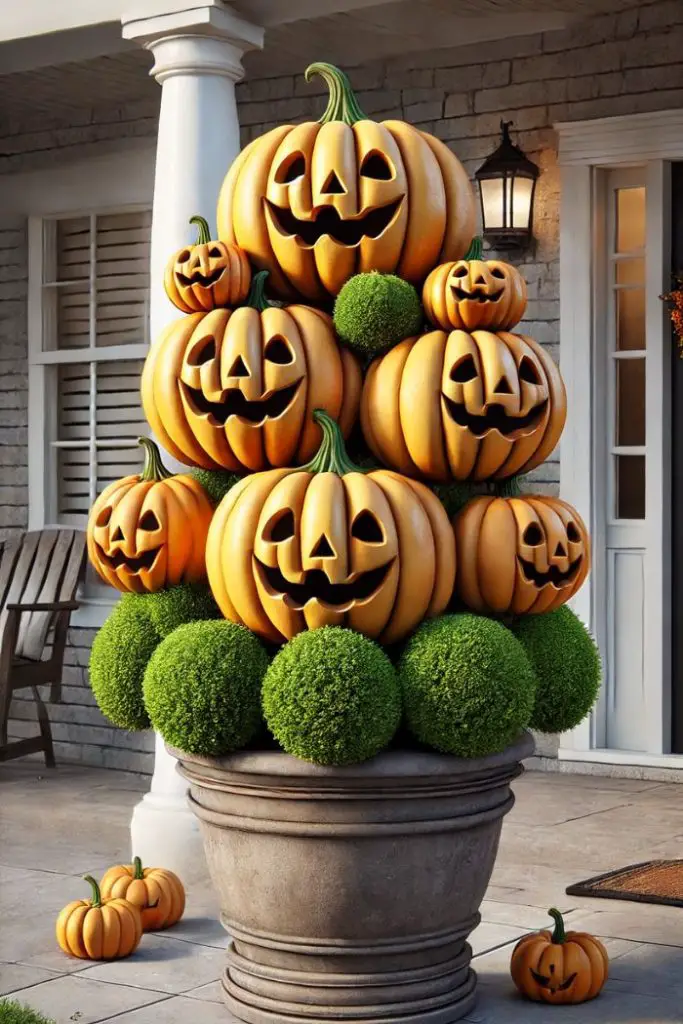
Why Do This Idea?: A pumpkin topiary adds a touch of elegance and festivity to your porch. It’s a versatile decoration that can be customized to fit your style.
Materials List:
- Faux pumpkins (various sizes)
- Wooden dowel or metal rod
- Large planter
- Floral foam
- Decorative moss or leaves
- Hot glue gun
Step-by-Step Instructions:
- Prepare the Planter: Fill the large planter with floral foam to create a stable base.
- Insert the Dowel: Insert the wooden dowel or metal rod into the center of the floral foam. Ensure it is firmly in place.
- Stack the Pumpkins: Push the faux pumpkins onto the dowel, starting with the largest at the bottom. Continue stacking smaller pumpkins on top.
- Secure the Pumpkins: Use a hot glue gun to secure the pumpkins in place. This prevents them from shifting or falling.
- Add Decorative Elements: Cover the base with decorative moss or leaves to hide the foam and add a natural touch.
How to Choose the Right Pumpkins for a Topiary?
When choosing pumpkins for a topiary, consider using faux pumpkins as they are lightweight and durable. Look for pumpkins of varying sizes to create a visually appealing stack. Ensure the pumpkins have flat tops and bottoms for better stability. You can find faux pumpkins at craft stores and online retailers. For a cohesive look, choose pumpkins in a similar color palette or paint them to match your decor.
Can I Use Real Pumpkins for a Topiary?
Yes, you can use real pumpkins for a topiary, but they require more maintenance. Real pumpkins are heavier and may not stack as easily as faux ones. Ensure you select pumpkins with flat tops and bottoms for better stability. Real pumpkins can also rot over time, especially if exposed to the elements. To prolong their life, consider using a pumpkin preservative or displaying the topiary in a sheltered area.
Idea 9: Mummy-Wrapped Door or Porch
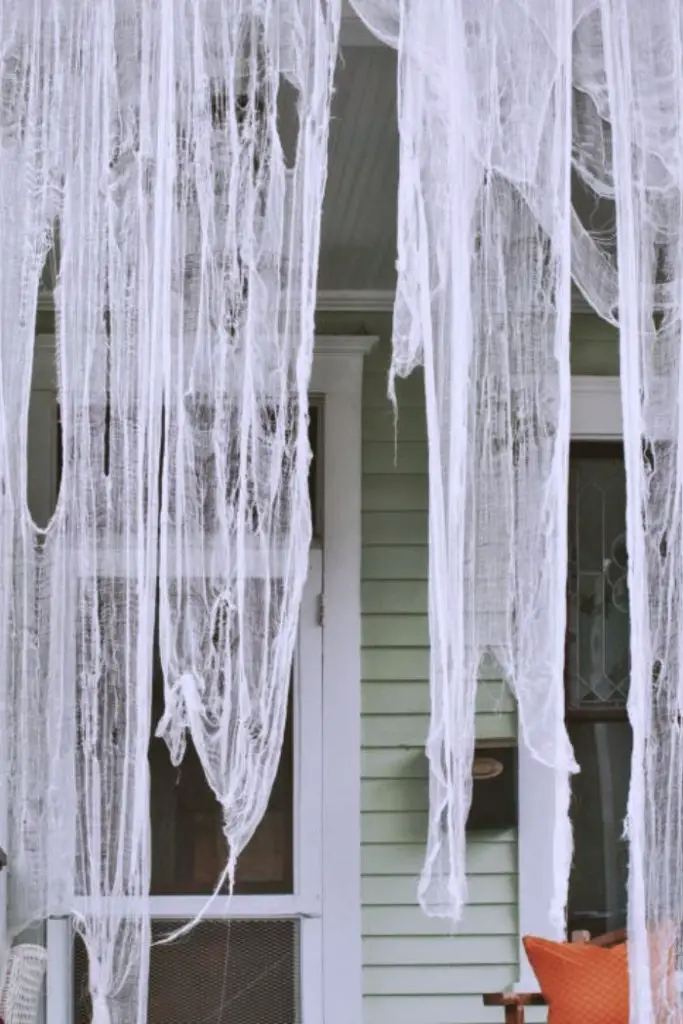
Why Do This Idea?: Mummy-wrapping adds a fun and spooky touch to your porch. They are easy to create and instantly transform your entrance.
Materials List:
- White crepe paper or gauze
- Double-sided tape or adhesive
- Googly eyes or black construction paper
- Scissors
Step-by-Step Instructions:
- Wrap the Columns: Start at the top of the columns or posts and begin wrapping them with white crepe paper or gauze. Overlap the layers slightly to create a bandage effect.
- Secure the Ends: Use double-sided tape or adhesive to secure the ends of the crepe paper or gauze.
- Add Eyes: Attach googly eyes or cut out eye shapes from black construction paper. Place them near the top of the columns to give the appearance of a mummy.
- Adjust the Wraps: Fluff and adjust the wraps to give a tattered and realistic look.
How to Keep the Wrapping in Place?
To keep the wrapping in place, start by securing the end of the crepe paper or gauze with double-sided tape or adhesive at the top of the column. Wrap tightly but not too tight to avoid tearing. Use additional pieces of tape or adhesive at intervals to ensure the wrapping stays put. If the weather is windy, consider using extra adhesive or tying the ends to prevent them from unraveling.
Can I Use Other Materials for Wrapping?
Yes, you can use other materials like old white sheets, bandages, or even toilet paper. Old white sheets can be torn into strips for a more authentic mummy look. Bandages offer a stretchy and easy-to-use option. Toilet paper can work in a pinch but may not be as durable, especially in wet or windy conditions. Choose a material that fits your aesthetic and is easy to work with.
Idea 10: Spooky Silhouette Windows
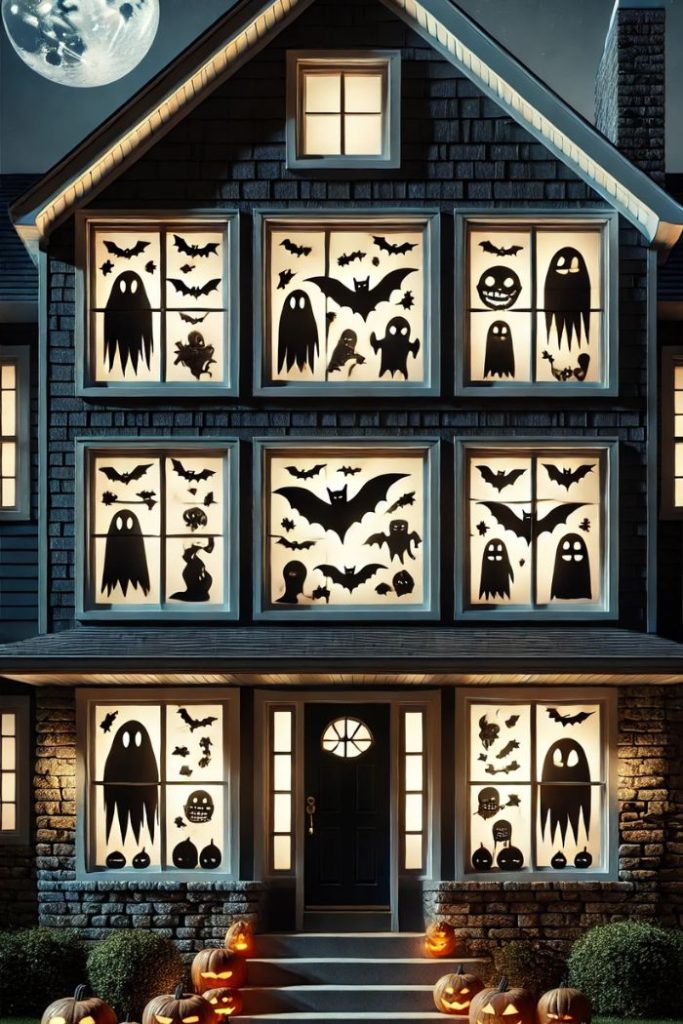
Why Do This Idea?: Spooky silhouette windows create an eerie ambiance and make your house look haunted from the outside. They are easy to make and can be customized to fit your Halloween theme.
Materials List:
- Black construction paper
- Scissors
- Tape or adhesive putty
- Templates for silhouettes (optional)
Step-by-Step Instructions:
- Choose Your Designs: Decide on the spooky shapes you want to display, such as ghosts, witches, bats, or monsters. You can find templates online or draw your own.
- Cut Out the Silhouettes: Use the black construction paper to cut out your chosen silhouettes. Make sure the shapes are large enough to be seen from outside.
- Attach to Windows: Use tape or adhesive putty to attach the silhouettes to the inside of your windows. Place them so they are clearly visible from the outside.
- Add Backlighting: To enhance the effect, place a light source behind the silhouettes. This can be a lamp, string lights, or even a flashlight to make the shapes glow in the dark.
How to Create Detailed Silhouettes?
To create detailed silhouettes, start by drawing or printing a template of your desired shape. Use a sharp pair of scissors or a craft knife for intricate cuts. For more complex designs, you can use a cutting machine like a Cricut. Take your time to ensure clean edges and precise details. If you’re not confident in your drawing skills, look for free templates online that you can trace or print.
What Kind of Lights Work Best for Backlighting?
Battery-operated LED lights work best for backlighting as they are safe and easy to place. You can also use string lights, which can be arranged around the window frame for even illumination. Avoid using candles or any open flame for safety reasons. Choose warm white lights for a classic spooky look, or use colored lights for a more dramatic effect. Ensure the lights are placed securely to avoid any fire hazards or accidents.
Idea 11: Spider Web Porch
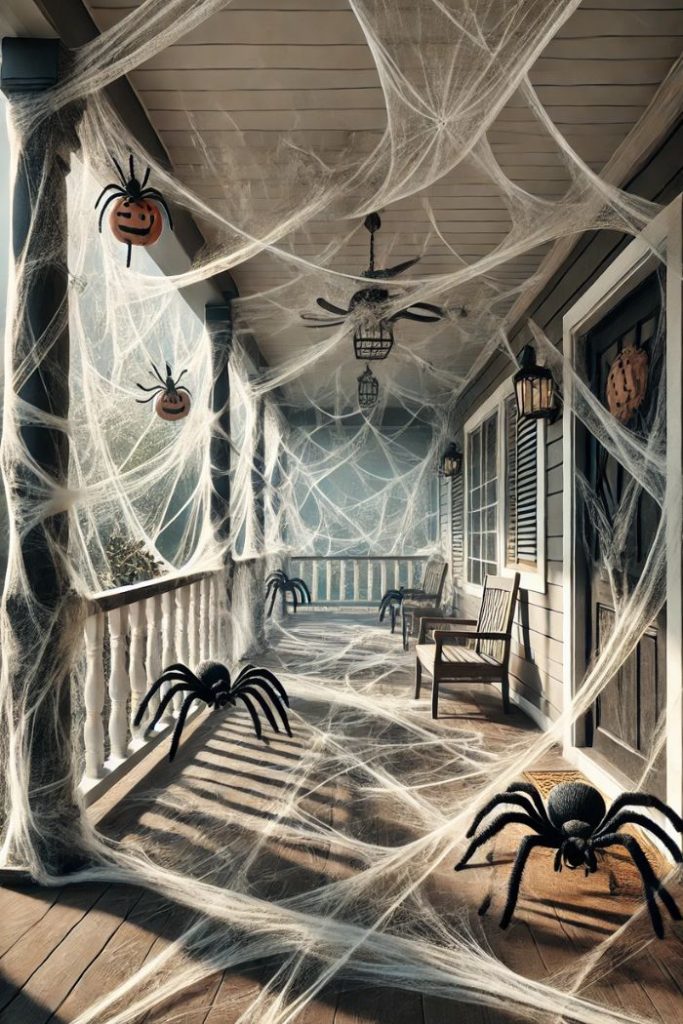
Why Do This Idea?: A spider web porch creates a classic and creepy Halloween look. It’s simple to set up and makes your porch look like it’s been taken over by giant spiders.
Materials List:
- Fake spider web material
- Large plastic spiders
- Double-sided tape or hooks
- Scissors
Step-by-Step Instructions:
- Spread the Webs: Stretch the fake spider web material across your porch. Make sure to spread it thinly to give it a more realistic look.
- Secure the Webs: Use double-sided tape or hooks to secure the web material to surfaces like railings, walls, and door frames.
- Add Spiders: Place large plastic spiders on the web. Position them in different areas to create the illusion that they are crawling around.
- Adjust for Realism: Fluff and adjust the web material to make it look natural and tangled.
How to Make Spider Webs Look Realistic?
To make spider webs look realistic, stretch the web material as thin as possible. Real spider webs are delicate and thin, so avoid clumping the material. Attach the web to multiple points to create a tangled and spread-out effect. You can also add smaller spiders and other creepy crawlies to enhance the realism. Placing the web in areas where it can catch light will make it more visible and eerie.
Where to Buy Fake Spider Web Material?
Fake spider web material can be found at most party supply stores, Halloween stores, and big-box retailers. You can also find it online through sites like Amazon. Look for high-quality web material that is stretchy and easy to work with. Some kits come with spiders included, which can be a convenient option. Buying in bulk can be cost-effective if you plan to cover a large area.
Idea 12: Scary Soundtrack Setup
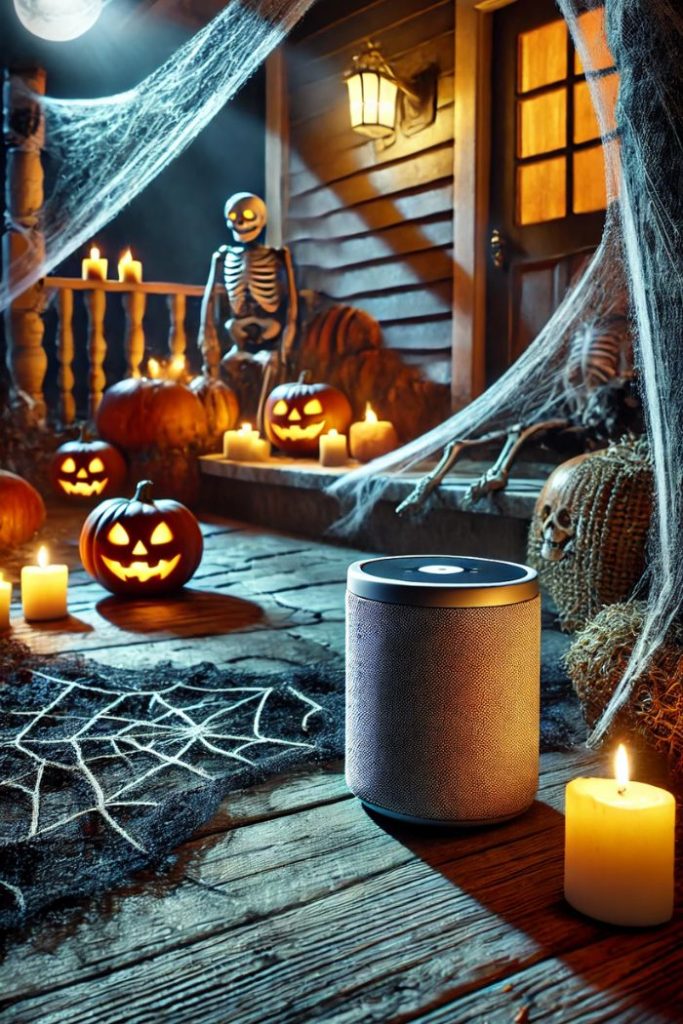
Why Do This Idea?: A scary soundtrack setup adds an auditory element to your Halloween decor, making the atmosphere even more immersive and spooky. It enhances the overall experience for trick-or-treaters and guests.
Materials List:
- Bluetooth speaker or outdoor speaker system
- Smartphone or MP3 player
- Halloween soundtrack or sound effects app
- Extension cord (if needed)
Step-by-Step Instructions:
- Choose a Soundtrack: Select a Halloween soundtrack or download a sound effects app with spooky sounds like creaking doors, ghostly wails, and eerie music.
- Set Up the Speaker: Place the Bluetooth speaker or outdoor speaker system in a concealed but central location on your porch. Ensure it is protected from the elements if it’s not weatherproof.
- Connect Your Device: Pair your smartphone or MP3 player with the speaker via Bluetooth. If using a wired setup, connect your device to the speaker with an appropriate cable.
- Play the Soundtrack: Start playing your chosen Halloween soundtrack. Adjust the volume to create an eerie ambiance without being too loud for neighbors.
What Are the Best Halloween Soundtracks?
The best Halloween soundtracks often include a mix of creepy sound effects and eerie music. Look for soundtracks that feature sounds like howling wolves, creaking doors, whispering voices, and ghostly wails. Some popular options include “Halloween Sound Effects” albums and playlists on streaming services like Spotify. You can also find free sound effects on websites like SoundBible or Freesound. Creating a custom playlist with a mix of effects and music can make your setup unique.
How to Protect the Speaker from the Elements?
To protect the speaker from the elements, place it in a sheltered location, such as under a porch roof or inside a decorative container. Use a waterproof Bluetooth speaker if possible, as they are designed to withstand rain and moisture. If using a wired setup, ensure that all connections are covered and protected from water. You can also use plastic bags or waterproof covers to shield the speaker and connections. Regularly check the setup to ensure it remains dry and functional.
Idea 13: Glowing Ghosts
Why Do This Idea?: Glowing ghosts create an eerie, otherworldly effect that enhances the spooky atmosphere of your porch. They are easy to make and look great at night.
Materials List:
- White balloons
- White fabric or cheesecloth
- Glow sticks or LED lights
- Black marker
- String or fishing line
- Tape
Step-by-Step Instructions:
- Inflate the Balloons: Inflate the white balloons to the desired size. These will form the heads of your ghosts.
- Activate Glow Sticks: Activate glow sticks or turn on LED lights and place them inside the balloons before tying them off.
- Cover with Fabric: Drape white fabric or cheesecloth over each balloon. The fabric should be long enough to cover the balloon and hang down like a ghostly body.
- Draw Faces: Use a black marker to draw spooky faces on the fabric covering the balloons.
- Hang the Ghosts: Attach string or fishing line to the tops of the balloons and hang them from your porch ceiling or tree branches. Ensure they hang at different heights for a more dynamic look.
How to Make Ghosts Glow Brighter?
To make your ghosts glow brighter, use multiple glow sticks or a high-intensity LED light inside each balloon. Glow sticks are easy and inexpensive but may not last as long as LED lights. For a longer-lasting effect, opt for battery-operated LED lights, which can provide a consistent glow all night. Ensure the fabric is thin enough to allow the light to shine through effectively. You can also use phosphorescent paint on the fabric to add an extra glow.
Where to Find Materials for Glowing Ghosts?
You can find most materials for glowing ghosts at craft stores, party supply stores, and online retailers. White balloons and fabric are commonly available, and glow sticks can often be found in the seasonal section of big-box stores. LED lights can be purchased at electronics stores or online. For a budget-friendly option, check dollar stores for basic supplies. Make sure to gather all materials in advance to avoid last-minute shopping.
Idea 14: Creepy Candle Display
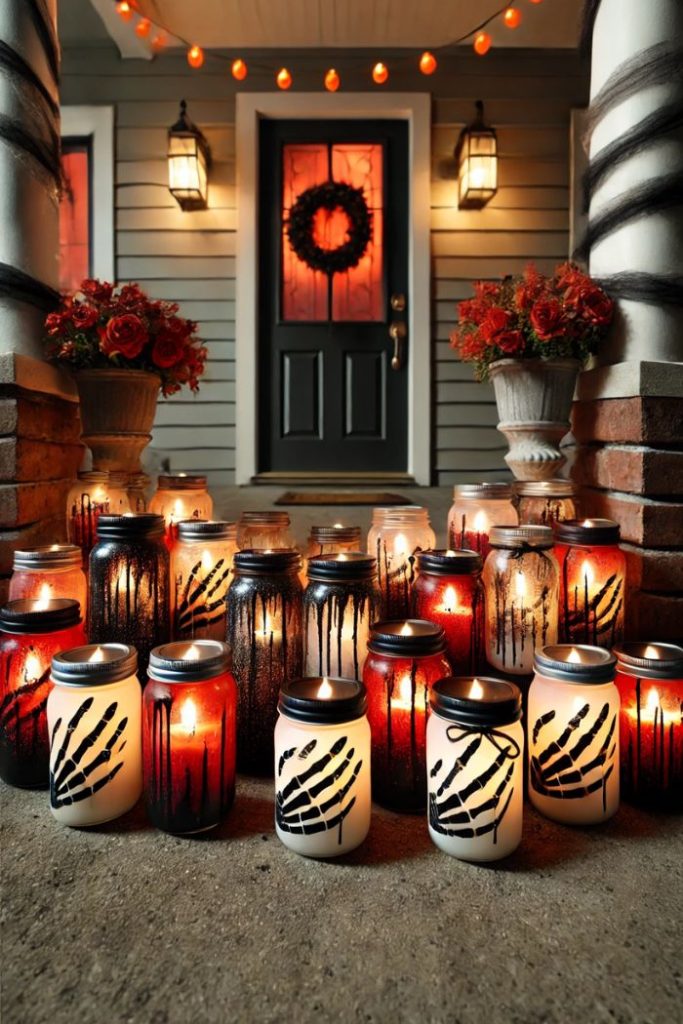
Why Do This Idea?: A creepy candle display adds a classic, eerie glow to your porch. It’s a versatile decoration that can be as simple or elaborate as you like.
Materials List:
- Battery-operated candles
- Glass jars or candle holders
- Black and red paint
- Paintbrushes
- Fake spider webs or moss
Step-by-Step Instructions:
- Prepare the Jars: Clean the glass jars or candle holders thoroughly. This ensures the paint adheres well.
- Paint the Jars: Use black and red paint to create a spooky design on the jars. You can paint drips, splatters, or silhouettes of bats and spiders.
- Insert the Candles: Place battery-operated candles inside the painted jars. Battery-operated candles are safer than real ones and can be left unattended.
- Add Webs or Moss: Decorate around the base of the jars with fake spider webs or moss to enhance the creepy effect.
- Arrange the Display: Arrange the jars in a cluster on your porch. Vary the heights and positions to create an eye-catching display.
How to Make the Candle Display Look More Spooky?
To make the candle display look spookier, use a combination of different jar sizes and shapes. Add extra elements like plastic spiders, bats, or small skulls around the jars. You can also use flickering LED candles to mimic the look of real flames. Consider placing the display in a dimly lit area to enhance the eerie glow. Using colors like deep purple, green, or black for the jars can add to the spooky ambiance.
Where to Find Battery-Operated Candles?
Battery-operated candles can be found at most craft stores, home decor stores, and online retailers like Amazon. They are available in various sizes, from small tealights to large pillar candles. Look for candles with a flickering effect for a more realistic look. Some stores, especially around Halloween, offer candles with spooky designs or colors. Purchasing in bulk can often save money if you need many candles for your display.
Idea 15: Witch’s Cauldron
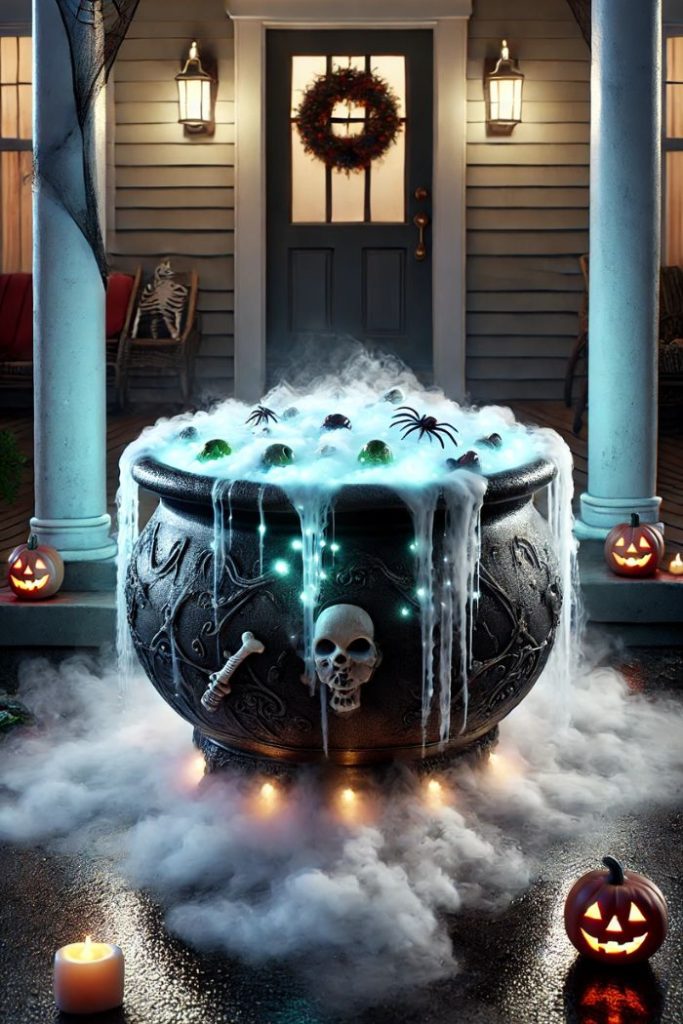
Why Do This Idea?: A witch’s cauldron adds a classic Halloween touch to your porch. It creates a focal point that can be both spooky and fun, especially with a bubbling effect.
Materials List:
- Large plastic cauldron
- Dry ice or a fog machine
- LED lights or glow sticks
- Plastic bones or creepy crawlies
- Water
- Gloves and tongs (for handling dry ice)
Step-by-Step Instructions:
- Prepare the Cauldron: Place the large plastic cauldron in a prominent spot on your porch.
- Add Lights: Place LED lights or glow sticks inside the cauldron to create an eerie glow.
- Add Decorations: Fill the cauldron with plastic bones or creepy crawlies for added effect.
- Create Fog Effect: If using dry ice, carefully add pieces of dry ice to the cauldron using gloves and tongs. Pour warm water over the dry ice to create a bubbling fog effect. Alternatively, set up a fog machine near the cauldron and direct the fog into it.
- Safety Check: Ensure the area is safe for visitors, especially if using dry ice. Keep the cauldron out of reach of children and pets.
How to Safely Handle Dry Ice?
Dry ice should be handled with care. Always use gloves and tongs when handling dry ice to avoid burns. Store it in an insulated container to slow down the sublimation process. Never place dry ice in an airtight container, as it can cause a build-up of pressure and potentially explode. Keep dry ice in a well-ventilated area to prevent the build-up of carbon dioxide gas. Always supervise children and pets around dry ice to ensure their safety.
Where to Buy a Large Plastic Cauldron?
Large plastic cauldrons are available at most Halloween stores and party supply stores during the fall season. You can also find them online through retailers like Amazon, eBay, and specialty Halloween websites. Check local craft stores as well, as they often stock cauldrons and other Halloween decor. If you’re looking for a more durable option, some garden centers offer large pots that can double as cauldrons.
Idea 16: Bat Swarm Decoration
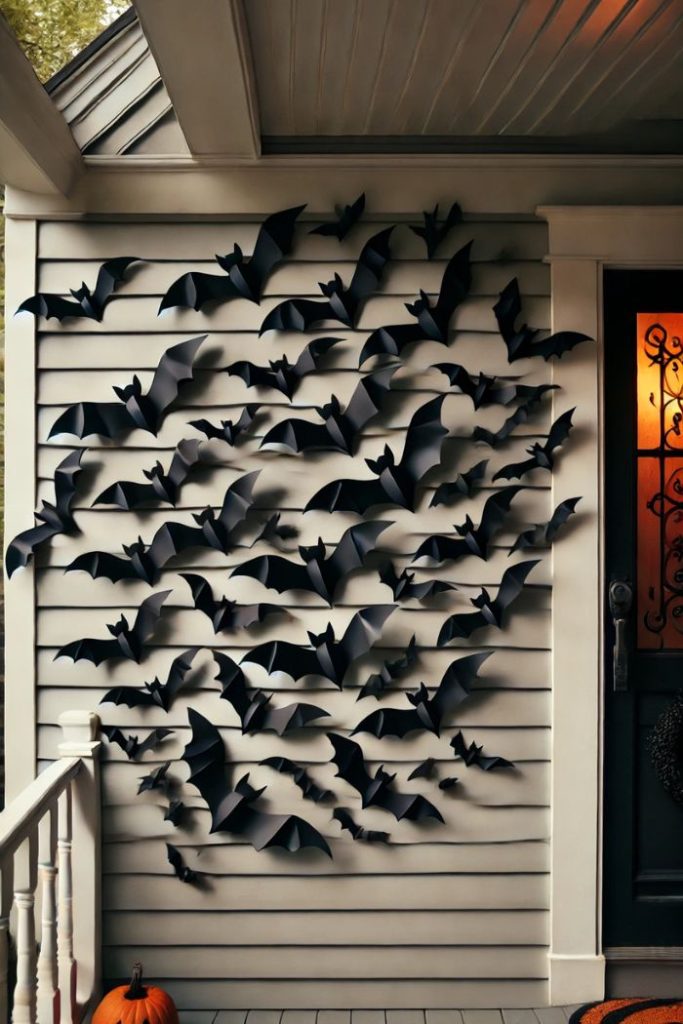
Why Do This Idea?: A bat swarm decoration adds a dynamic and spooky element to your porch. It creates the illusion of bats flying out from your house, which is perfect for Halloween.
Materials List:
- Black construction paper or cardstock
- Bat templates
- Scissors
- Double-sided tape or adhesive putty
Step-by-Step Instructions:
- Create Bat Templates: Draw or print bat templates in various sizes. Cut them out to use as stencils.
- Cut Out Bats: Trace the bat templates onto black construction paper or cardstock. Cut out multiple bats in different sizes for variety.
- Arrange the Bats: Plan the placement of the bats, starting from a focal point like the door or window and spreading outward.
- Attach the Bats: Use double-sided tape or adhesive putty to attach the bats to the walls, door, and windows. Angle the bats to create the illusion of movement.
- Adjust for Effect: Ensure the bats are placed at varying angles and distances to make it look like they are swarming.
How to Make Bats Look More Realistic?
To make the bats look more realistic, use high-quality black cardstock for a sturdy appearance. Add details like tiny eyes or wings using a silver or white pen. Slightly fold the wings of each bat to give them a 3D effect. Placing the bats in clusters and at different angles helps create a more dynamic and natural look. You can also use a matte black spray paint on the bats to reduce shine and enhance realism.
Where to Find Bat Templates?
You can find bat templates online by searching for free printable bat templates. Many craft and Halloween websites offer downloadable templates in various sizes. Alternatively, you can draw your own bat shapes by hand or use bat-shaped cookie cutters as stencils. Craft stores may also carry pre-cut bat shapes, especially around Halloween. Having a variety of sizes and styles will add depth and interest to your decoration.
Idea 17: Haunted House Sign
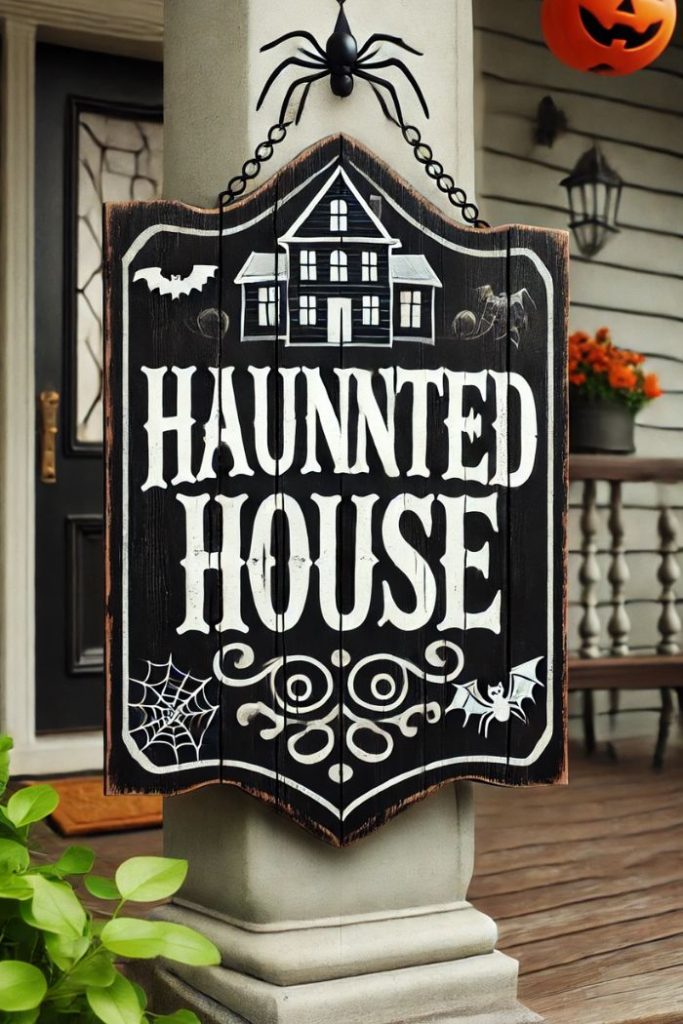
Why Do This Idea?: A haunted house sign is an easy and effective way to set the spooky tone for your porch. It welcomes visitors with a creepy message and adds to the Halloween ambiance.
Materials List:
- Wooden board or foam board
- Black paint
- White paint or glow-in-the-dark paint
- Paintbrushes
- Stencils or freehand drawing
- String or rope (for hanging)
Step-by-Step Instructions:
- Prepare the Board: Choose a wooden or foam board as your sign base. Make sure it’s clean and dry.
- Paint the Background: Paint the board black using a paintbrush. Apply a couple of coats for full coverage and let it dry completely.
- Add the Message: Use white paint or glow-in-the-dark paint to write your spooky message, like “Haunted House” or “Enter If You Dare.” You can use stencils for clean letters or freehand draw for a more eerie look.
- Add Details: Paint additional spooky details like spiders, bats, or ghostly shapes around the text to enhance the theme.
- Attach String: Once the paint is dry, attach a piece of string or rope to the back of the board for hanging. Secure it firmly so the sign hangs straight.
- Hang the Sign: Hang the sign on your porch, either on the door, a wall, or from a hook.
How to Make the Sign Weatherproof?
To make your haunted house sign weatherproof, use outdoor paint or seal the finished sign with a clear weatherproof sealant. Ensure that all edges and the back of the board are also coated to protect from moisture. If using a foam board, consider adding a layer of varnish for extra protection. Store the sign indoors during heavy rain or strong winds to prolong its life. Regularly check the sign for any wear and tear and touch up as needed.
Where to Find Materials for a Haunted House Sign?
Materials for a haunted house sign can be found at craft stores, home improvement stores, and online retailers like Amazon. Wooden boards and foam boards are commonly available in various sizes. Paint and brushes can be purchased at any craft store or big-box retailer. Stencils are also available in craft stores, or you can create your own using cardboard or plastic. During Halloween season, many stores stock themed supplies specifically for creating spooky decorations.
Idea 18: Giant Spider and Web
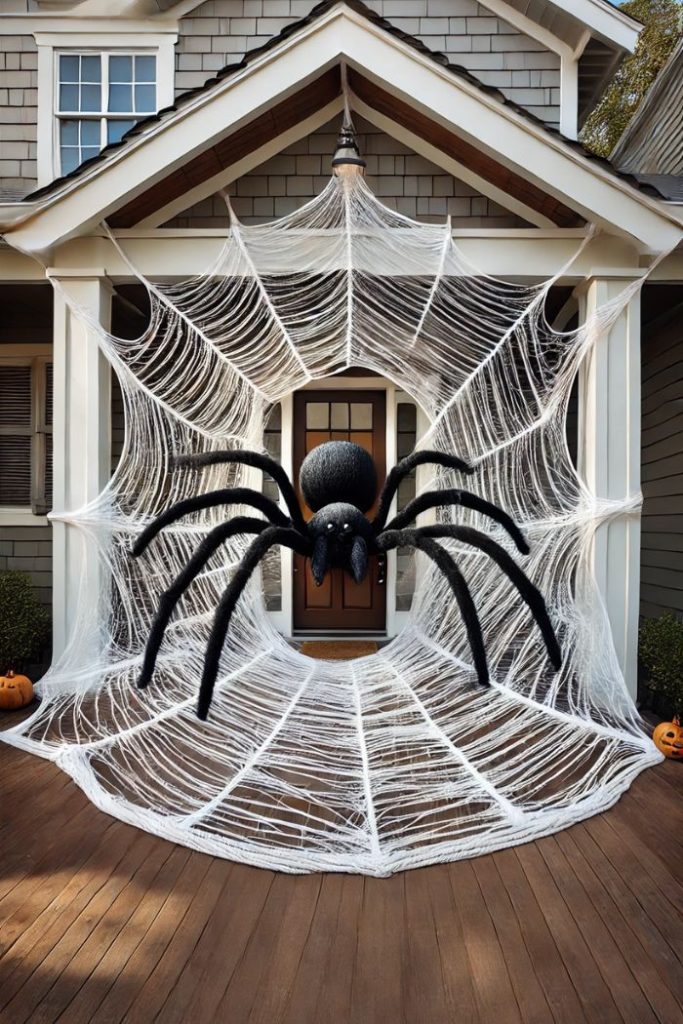
Why Do This Idea?: A giant spider and web create a dramatic and spooky centerpiece for your porch. It’s a great way to make a big impact with your Halloween decorations.
Materials List:
- Large plastic spider
- Thick white rope or twine
- Clear fishing line
- Scissors
- Hooks or nails
Step-by-Step Instructions:
- Create the Web Frame: Use the thick white rope or twine to create the frame of the spider web. Attach one end to a fixed point, like a hook or nail, and stretch it across to another fixed point. Repeat this to create a star-like pattern.
- Add Web Strands: Cut shorter pieces of rope or twine to connect the main strands, forming the web. Tie or weave these pieces between the main strands, ensuring they are tight and secure.
- Secure the Web: Attach the web to your porch using hooks or nails. Make sure it is taut and stable.
- Place the Spider: Position the large plastic spider in the center of the web or climbing up one of the strands. Use clear fishing line to tie the spider in place if needed.
- Adjust for Effect: Make sure the web is spread out evenly and the spider is visible from a distance.
How to Make the Web More Realistic?
To make the web look more realistic, use rope or twine that is slightly frayed to mimic the look of real spider silk. You can also add smaller fake spiders to the web to enhance the effect. For an extra creepy touch, spray the web with glow-in-the-dark paint or add fake leaves and debris to make it look aged and weathered. Position the web in a location where it can catch the light to create shadows and highlights that add to the spooky ambiance.
Where to Find Large Plastic Spiders?
Large plastic spiders can be found at most Halloween stores, party supply stores, and online retailers like Amazon. They come in various sizes and styles, some even with realistic fur or glowing eyes. Check big-box stores during the Halloween season as they often carry a variety of outdoor decorations. You can also find them at craft stores, where they may be included in sets with other creepy creatures. If you prefer a more personalized look, consider making your own spider using craft supplies like foam balls and pipe cleaners.
Idea 19: Scarecrow Greeter
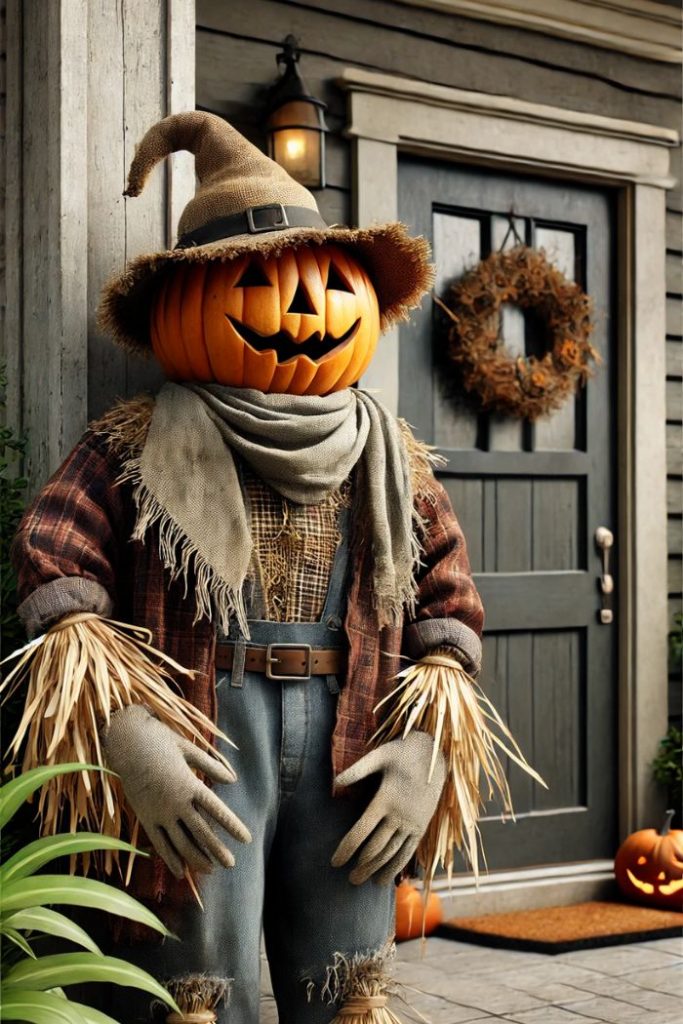
Why Do This Idea?: A scarecrow greeter adds a friendly yet spooky touch to your porch. It’s a versatile decoration that can be customized to be as scary or as welcoming as you like.
Materials List:
- Old clothes (shirt, pants, hat)
- Straw or hay
- Wooden stakes or broomstick
- Twine or zip ties
- Gloves (optional)
- Pumpkin or burlap sack (for the head)
- Permanent markers or paint (for the face)
Step-by-Step Instructions:
- Create the Body: Stuff the old shirt and pants with straw or hay to create the scarecrow’s body. Secure the ends of the sleeves and pant legs with twine or zip ties to keep the stuffing in place.
- Assemble the Frame: Use wooden stakes or a broomstick to create a frame for the scarecrow. Attach the stuffed shirt and pants to the frame using twine or zip ties.
- Add the Head: Use a pumpkin or a burlap sack for the head. Draw or paint a spooky or friendly face on it. Attach the head to the top of the frame.
- Dress the Scarecrow: Put gloves on the ends of the sleeves (optional) and add a hat to the head. Adjust the clothing and stuffing to make the scarecrow look more lifelike.
- Position the Scarecrow: Place the scarecrow on your porch, securing it to a post or railing if necessary to keep it upright.
How to Make a Scarecrow More Durable?
To make your scarecrow more durable, use weather-resistant materials for the stuffing and clothing. Instead of straw or hay, consider using plastic bags or foam stuffing that can withstand rain and wind. Secure all parts tightly to prevent them from coming loose. Applying a waterproof sealant to the face can help protect it from the elements. For added stability, anchor the frame to the ground or a solid structure.
Where to Find Materials for a Scarecrow?
You can find most materials for a scarecrow at home improvement stores, garden centers, and craft stores. Old clothes can be sourced from your closet or a thrift store. Straw or hay is often available at garden centers or farm supply stores. Wooden stakes or broomsticks can be found at home improvement stores, and burlap sacks are available at craft stores or online. During the fall season, many stores also carry scarecrow-making kits that include all the necessary materials.
Idea 20: Black Cat Silhouettes
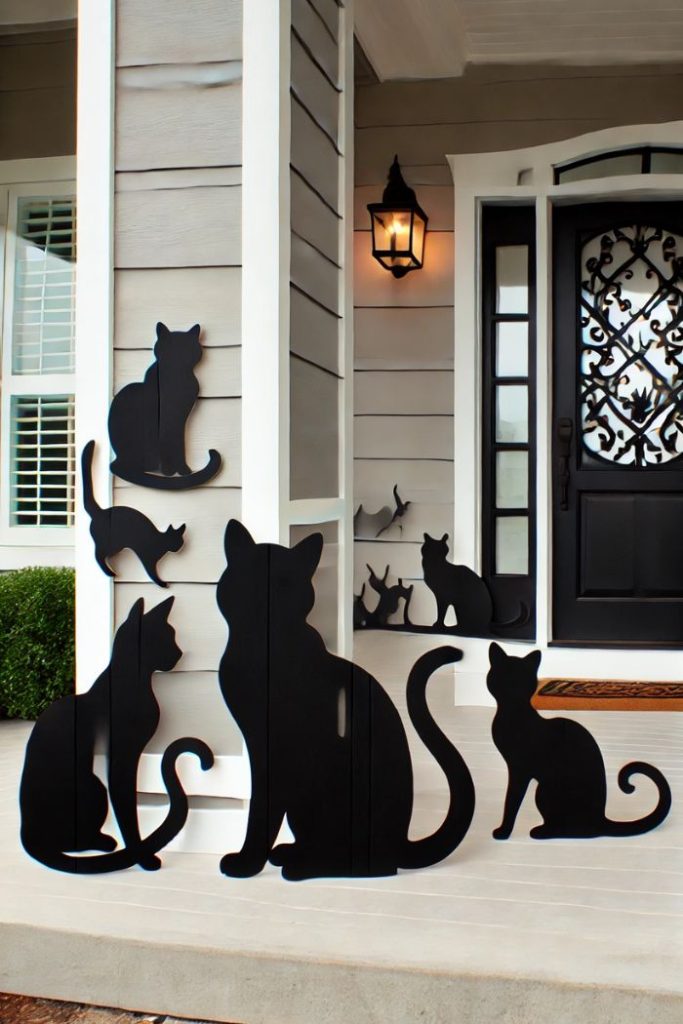
Why Do This Idea?: Black cat silhouettes add a spooky and mysterious element to your porch decor. They are easy to make and can be placed in various positions to create a dynamic and eerie scene.
Materials List:
- Black foam board or heavy cardstock
- Cat silhouette templates
- Scissors or a craft knife
- Wooden stakes or dowels
- Hot glue gun or strong adhesive
- Clear fishing line (optional)
Step-by-Step Instructions:
- Choose Your Templates: Find or create cat silhouette templates in various poses. Print them out or draw them freehand.
- Cut Out Silhouettes: Trace the templates onto the black foam board or heavy cardstock. Carefully cut out the shapes using scissors or a craft knife.
- Attach Stakes: Use a hot glue gun or strong adhesive to attach wooden stakes or dowels to the back of each silhouette. This will allow you to easily place them in your yard or garden.
- Position the Cats: Place the silhouettes around your porch, garden, or walkway. Arrange them in different poses to create a lively and spooky scene.
- Secure in Place: If placing them on the porch, use clear fishing line to secure the silhouettes to railings or posts to prevent them from falling over.
How to Make Silhouettes More Visible at Night?
To make the silhouettes more visible at night, consider adding a backlight or spotlight. Place small solar-powered lights behind or in front of the silhouettes to cast shadows and highlight their shapes. You can also use glow-in-the-dark paint or reflective tape on the edges of the silhouettes. This will make them stand out even in low light conditions and add an extra spooky effect to your decor.
Where to Find Cat Silhouette Templates?
You can find cat silhouette templates online by searching for free printable cat silhouettes. Many craft and Halloween websites offer downloadable templates in various poses and sizes. Craft stores may also have stencil kits that include cat shapes. If you prefer to create your own, you can draw simple cat shapes freehand or use photos as a reference. Using a variety of templates will help create a more dynamic and interesting display.
Idea 21: Haunted Mirror

Why Do This Idea?: A haunted mirror adds a chilling and eerie touch to your porch. It can create the illusion of ghostly figures and adds a sophisticated yet spooky element to your Halloween decorations.
Materials List:
- Old mirror or picture frame with glass
- Black spray paint
- White paint or frosted glass spray
- Masking tape
- Spooky decals or images (optional)
- Picture hanger or strong adhesive
Step-by-Step Instructions:
- Prepare the Mirror: Clean the mirror or glass thoroughly. If using a picture frame, remove the backing and clean the glass.
- Create a Haunted Effect: Use masking tape to cover areas you want to keep clear. Lightly spray the glass with frosted glass spray or white paint to create a misty effect. Let it dry.
- Add Spooky Details: Optionally, apply spooky decals or images to the back of the glass before spraying. This will make them appear faint and ghostly.
- Spray the Frame: Spray the frame with black spray paint to give it an aged and eerie look. Let it dry completely.
- Reassemble the Mirror: Place the glass back into the frame if you removed it. Secure it with the backing if necessary.
- Hang the Mirror: Hang the haunted mirror on your porch using a picture hanger or strong adhesive. Position it at eye level for the best effect.
How to Create a Ghostly Reflection?
To create a ghostly reflection, use a faint layer of frosted glass spray or white paint. This creates a cloudy, misty effect that looks like a haunted mirror. You can also place a transparent image of a ghost or skeleton behind the glass before spraying. When viewed from the front, this image will appear faint and eerie. Another option is to use a holographic sticker or a piece of sheer fabric behind the glass to create the illusion of a ghostly figure.
Where to Find Old Mirrors or Frames?
You can find old mirrors or frames at thrift stores, flea markets, and garage sales. Antique stores often have unique and vintage options that add extra character to your haunted mirror. Craft stores also sell plain mirrors and frames that you can customize. Online marketplaces like eBay and Etsy offer a wide variety of vintage and antique mirrors. Look for pieces with interesting details and shapes to enhance the spooky effect.
Idea 22: Spooky Skeleton Hands Planters
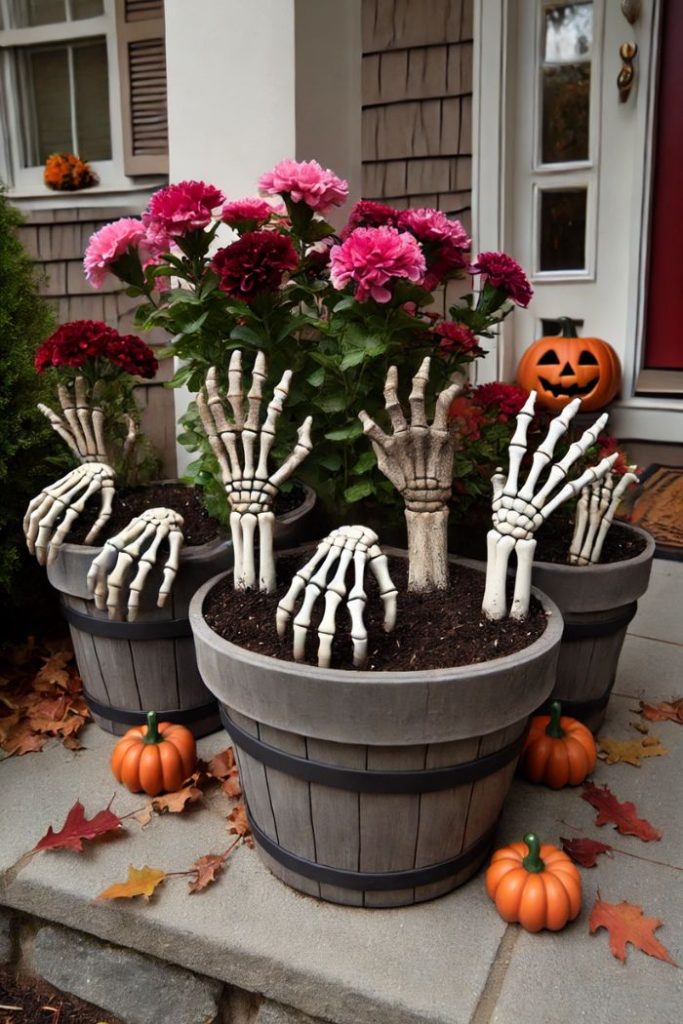
Why Do This Idea?: Spooky skeleton hands planters add a creepy yet creative touch to your porch. They give the illusion of skeleton hands emerging from your plants, perfect for a Halloween-themed garden.
Materials List:
- Plastic skeleton hands
- Flower pots or planters
- Soil
- Plants or flowers
- Hot glue gun or strong adhesive
Step-by-Step Instructions:
- Prepare the Planters: Fill your flower pots or planters with soil. Plant your chosen flowers or plants as you normally would.
- Attach the Hands: Use a hot glue gun or strong adhesive to attach the plastic skeleton hands to the sides of the flower pots. Position them as if they are emerging from the soil, gripping the edge of the pot.
- Secure in Place: Ensure the skeleton hands are firmly attached and adjust them to create a natural, gripping look.
- Arrange on Porch: Place the planters on your porch in visible spots. Group them together for a more dramatic effect.
How to Make Skeleton Hands Look More Realistic?
To make the skeleton hands look more realistic, consider painting them with a light wash of brown or green to give them an aged, weathered look. Adding details like dirt smudges or small cracks can enhance their creepy appearance. You can also slightly bend the fingers to create a more natural, grasping pose. Positioning the hands at different angles and depths in the soil adds to the realism, making them appear as if they are truly emerging from the earth.
Where to Find Plastic Skeleton Hands?
Plastic skeleton hands can be found at most Halloween stores, party supply stores, and craft stores during the Halloween season. They are also available online through retailers like Amazon and eBay. Look for hands that are the appropriate size for your planters and that have a realistic bone structure. Some sets come with articulated fingers, which can be adjusted for a more lifelike pose. Buying in bulk can often save money if you plan to make multiple planters.
Idea 23: Floating Witch Hats

Why Do This Idea?: Floating witch hats create a magical and spooky effect on your porch. They give the illusion that witches are flying around your house, adding a whimsical and eerie touch to your Halloween decorations.
Materials List:
- Witch hats (fabric or plastic)
- Clear fishing line
- Ceiling hooks or Command hooks
- LED tea lights (optional)
- Needle and thread
Step-by-Step Instructions:
- Prepare the Hats: If your witch hats are collapsible, make sure they are fully extended and hold their shape.
- Attach Fishing Line: Thread a needle with clear fishing line and poke it through the top point of each hat. Tie a knot inside the hat to secure the line. Leave a long enough length of line to hang from your desired height.
- Add Lights (Optional): Place an LED tea light inside each hat to create a glowing effect. Secure the tea light with tape if necessary to keep it in place.
- Hang the Hats: Attach ceiling hooks or Command hooks to the ceiling of your porch. Hang the witch hats at different heights using the fishing line to create the illusion of floating hats.
- Adjust for Effect: Arrange the hats so they look like they are hovering in mid-air. Make sure the fishing line is as invisible as possible for the best effect.
How to Make Witch Hats Float More Securely?
To make the witch hats float more securely, ensure that the fishing line is tightly secured to both the hat and the hook. Use a strong, clear fishing line that can support the weight of the hat and any additional items like LED lights. If you’re using fabric hats, consider reinforcing the top point with a small piece of cardboard to prevent tearing. Test each hat by gently tugging on the line to ensure it’s securely fastened. Regularly check the hooks and lines to make sure they remain in place, especially in windy conditions.
Where to Buy Witch Hats?
Witch hats can be found at most Halloween stores, party supply stores, and big-box retailers during the Halloween season. They are also available online through retailers like Amazon, eBay, and specialty Halloween websites. Look for hats that are lightweight and easy to hang. Some stores offer sets of witch hats, which can be more cost-effective if you plan to create multiple floating hats. If you prefer a more unique look, consider making your own witch hats using black fabric and cardboard.
Idea 24: Halloween Lanterns
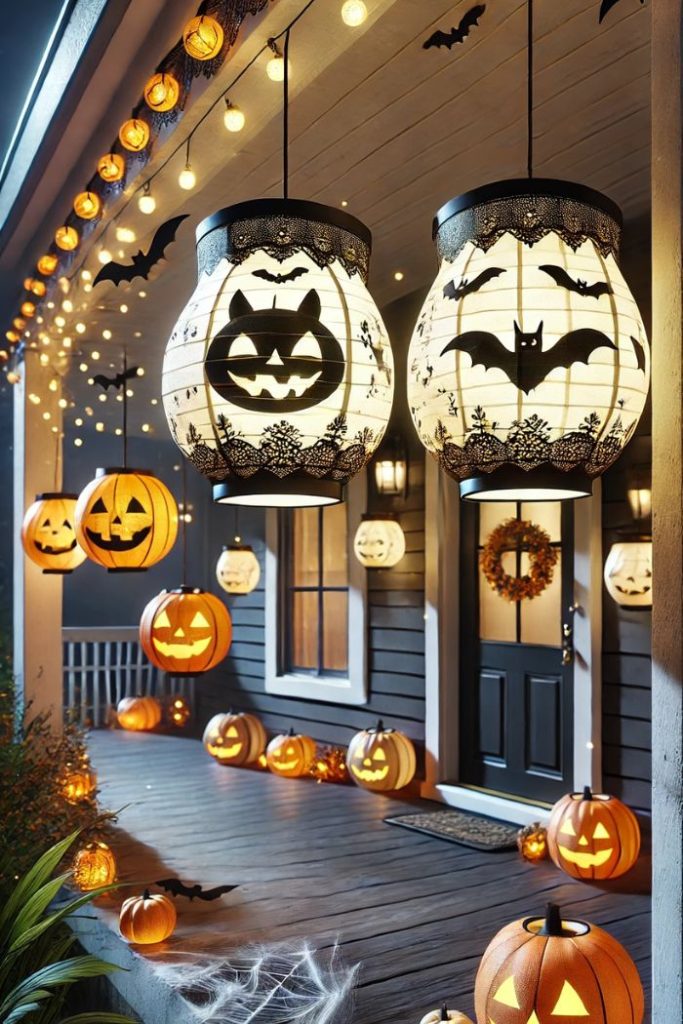
Why Do This Idea?: Halloween lanterns add a spooky and atmospheric glow to your porch. They can be customized with various Halloween-themed designs to enhance the festive look of your decorations.
Materials List:
- Paper lanterns (white or orange)
- Black construction paper
- Scissors
- Glue or double-sided tape
- LED candles or string lights
Step-by-Step Instructions:
- Prepare the Lanterns: Assemble the paper lanterns according to the instructions. Choose white or orange lanterns for a traditional Halloween look.
- Create Designs: Cut out Halloween-themed shapes from black construction paper, such as bats, spiders, pumpkins, or ghosts. You can find templates online or draw your own designs.
- Attach Designs: Use glue or double-sided tape to attach the black paper shapes to the outside of the lanterns. Arrange them evenly around the lantern for a balanced look.
- Add Lighting: Place LED candles inside the lanterns or wrap string lights around them to create a glowing effect. Avoid using real candles to prevent fire hazards.
- Hang the Lanterns: Hang the lanterns from your porch ceiling or place them on tables or steps. Ensure they are securely fastened if hanging to avoid them being blown away by the wind.
How to Make Lanterns More Durable for Outdoor Use?
To make lanterns more durable for outdoor use, choose lanterns made of thicker, weather-resistant paper or fabric. Apply a clear waterproof sealant spray to the outside of the lanterns to protect them from rain and moisture. If using string lights, ensure they are rated for outdoor use to avoid electrical hazards. Regularly check the lanterns for any damage and replace or repair them as needed. Store the lanterns indoors when not in use to prolong their lifespan.
Where to Find Paper Lanterns?
Paper lanterns can be found at party supply stores, craft stores, and online retailers like Amazon and eBay. They are available in various sizes, colors, and shapes, making it easy to find lanterns that fit your Halloween theme. Some stores offer pre-decorated Halloween lanterns, which can save time if you prefer a ready-made option. Look for lanterns with sturdy frames and good quality paper or fabric to ensure they last throughout the Halloween season.
Idea 25: Cobweb Covered Furniture
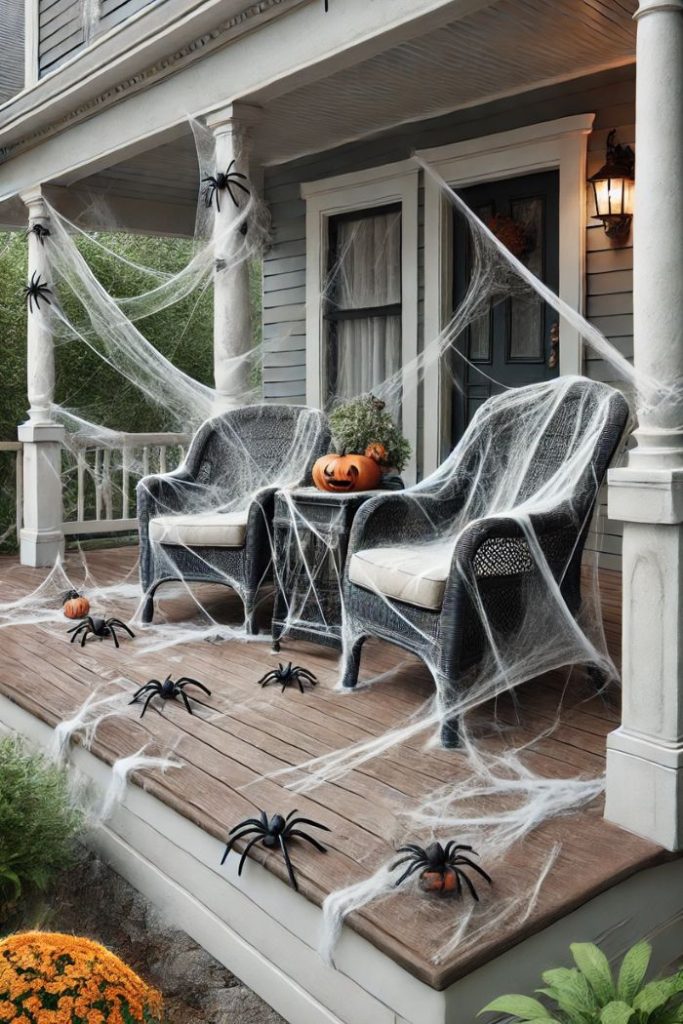
Why Do This Idea?: Cobweb-covered furniture gives your porch an abandoned, spooky look. It’s an easy and effective way to create a creepy atmosphere with minimal effort.
Materials List:
- Fake spider web material
- Outdoor furniture (chairs, tables, benches)
- Plastic spiders
- Double-sided tape or adhesive (optional)
Step-by-Step Instructions:
- Choose Furniture: Select outdoor furniture that you want to cover with cobwebs. Old or weathered furniture works best for a spooky effect.
- Spread the Cobwebs: Stretch the fake spider web material over the furniture. Spread it thinly and unevenly to create a realistic, abandoned look.
- Secure the Cobwebs: Use double-sided tape or adhesive to secure the cobwebs if necessary, especially in windy conditions.
- Add Spiders: Place plastic spiders on the cobweb-covered furniture. Position them in various places to make it look like they’re crawling around.
- Adjust for Realism: Fluff and stretch the cobweb material to make it look natural and creepy.
How to Make Cobwebs Look More Realistic?
To make cobwebs look more realistic, stretch the web material as thin as possible. Real spider webs are delicate and fine, so avoid clumping the material. Attach the web to multiple points on the furniture to create a tangled and spread-out effect. You can also add small, realistic-looking spiders and other creepy crawlies. Positioning the cobwebs in corners and around edges where real webs would naturally form enhances the realism. Lightly dusting the web with a small amount of baby powder can add to the aged and abandoned look.
Where to Find Fake Spider Web Material?
Fake spider web material can be found at most Halloween stores, party supply stores, and big-box retailers during the Halloween season. You can also find it online through retailers like Amazon and eBay. Look for high-quality web material that is stretchy and easy to work with. Some packages include plastic spiders, which can save you time and money. Buying in bulk can be more cost-effective if you plan to cover a large area.
Idea 26: Pumpkin Planters
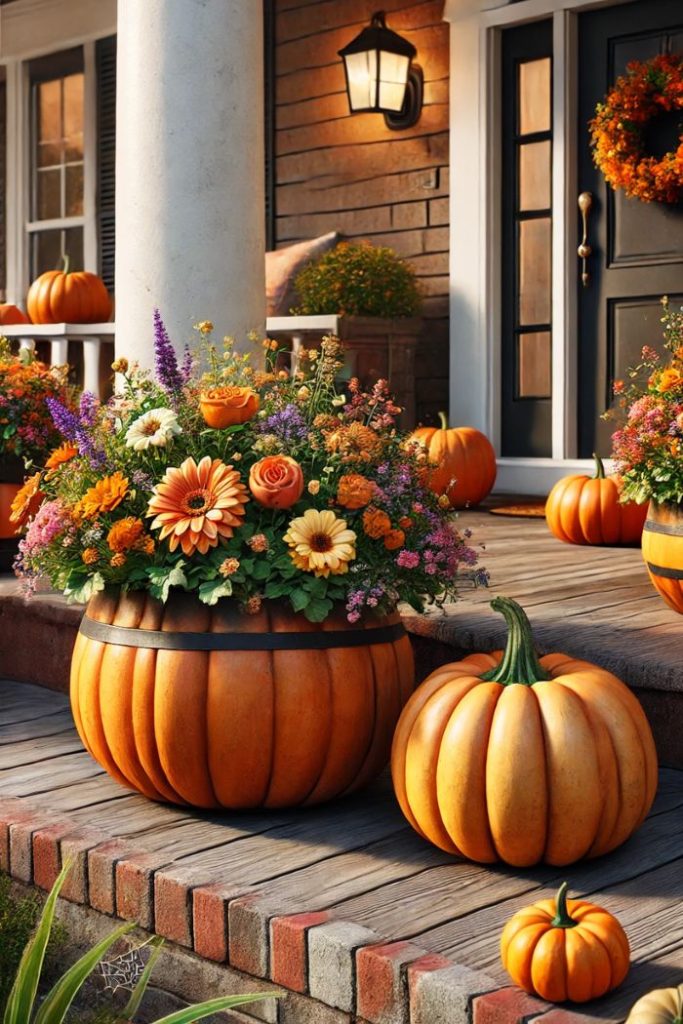
Why Do This Idea?: Pumpkin planters add a festive and natural touch to your porch. They combine the classic Halloween element of pumpkins with beautiful fall flowers or plants.
Materials List:
- Real or faux pumpkins
- Potting soil
- Fall flowers or plants (mums, pansies, ornamental kale)
- Knife (for real pumpkins)
- Drill (for faux pumpkins)
- Small garden trowel
Step-by-Step Instructions:
- Prepare the Pumpkin: If using a real pumpkin, cut off the top and scoop out the insides. For faux pumpkins, use a drill to create drainage holes at the bottom.
- Add Soil: Fill the pumpkin with potting soil, leaving some space at the top for your plants.
- Plant Flowers: Use the small garden trowel to plant your fall flowers or plants in the soil. Arrange them as desired, ensuring they are well-spaced and not overcrowded.
- Water the Plants: Water the plants thoroughly after planting to help them settle into their new container.
- Arrange on Porch: Place the pumpkin planters on your porch, either individually or in clusters for a more dramatic effect.
How to Keep Pumpkin Planters Looking Fresh?
To keep pumpkin planters looking fresh, water the plants regularly, especially if you are using real pumpkins, as they can dry out quickly. Place the planters in a spot where they get adequate sunlight based on the plants’ needs. For real pumpkins, check for signs of mold or decay and remove any affected areas promptly. You can also apply a thin layer of petroleum jelly or a pumpkin preservative spray to the inside of real pumpkins to slow down the rotting process. Using faux pumpkins can eliminate the issue of decay and provide a longer-lasting decoration.
Where to Find Fall Flowers and Plants?
Fall flowers and plants can be found at garden centers, nurseries, and home improvement stores. Look for seasonal selections like mums, pansies, ornamental kale, and asters, which are popular choices for fall planting. Many stores offer pre-potted arrangements that can be easily transferred into your pumpkin planters. You can also find a variety of fall plants online through gardening websites and retailers like Amazon. For a more unique selection, visit local farmers’ markets or plant sales.
Idea 27: Ghostly Front Door
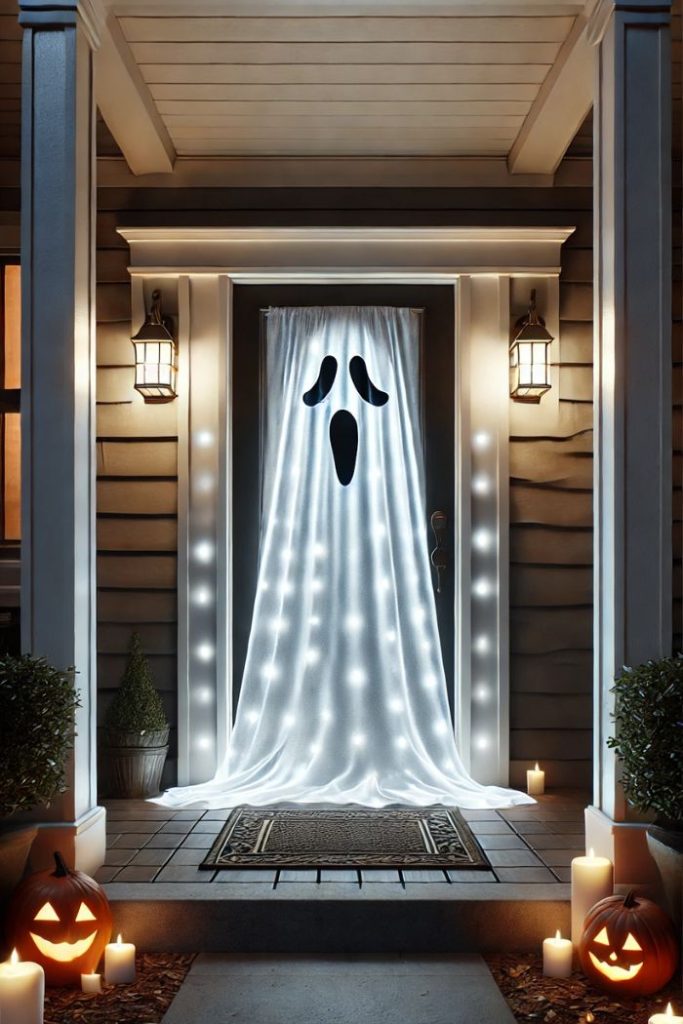
Why Do This Idea?: A ghostly front door creates an eerie entrance that sets the tone for your Halloween decorations. It’s a simple yet effective way to give your porch a spooky makeover.
Materials List:
- White fabric or sheet
- Scissors
- Black construction paper
- Tape or adhesive putty
- String or ribbon
- LED lights or glow sticks (optional)
Step-by-Step Instructions:
- Cut the Fabric: Cut the white fabric or sheet to fit over your front door. Leave some extra length at the bottom to create a flowing ghostly effect.
- Create the Ghost Face: Cut out eyes and a mouth from the black construction paper. Make the shapes large enough to be seen from a distance.
- Attach the Face: Use tape or adhesive putty to attach the eyes and mouth to the top half of the fabric, positioning them where a face would be.
- Drape the Fabric: Drape the fabric over your front door, securing it at the top with tape, adhesive putty, or string. Let the extra length hang down freely.
- Add Lights (Optional): Place LED lights or glow sticks behind the fabric to create a glowing effect, enhancing the ghostly appearance at night.
How to Secure the Fabric in Windy Conditions?
To secure the fabric in windy conditions, use stronger adhesive like heavy-duty tape or adhesive hooks at the top and sides of the door. You can also tie the bottom corners of the fabric to nearby railings or weights to prevent it from blowing around. Adding a few more attachment points along the edges of the fabric can help keep it in place. Regularly check the setup to ensure everything remains secure, especially after strong winds.
Where to Find Suitable Materials for a Ghostly Front Door?
Suitable materials for a ghostly front door can be found at fabric stores, craft stores, and big-box retailers. White sheets or fabric are often available in the bedding or craft sections. Black construction paper can be found in the school supplies or craft sections of most stores. LED lights or glow sticks can be purchased in the seasonal or home improvement sections, or online through retailers like Amazon. Look for durable, weather-resistant materials if you plan to leave the decoration up for an extended period.
Frequently Asked Questions
What Are Some Easy Halloween Porch Decor Ideas?
Easy Halloween porch decor ideas include using fake spider webs, placing carved pumpkins or jack-o’-lanterns along the walkway, and hanging ghostly figures made from white fabric. You can also use battery-operated candles for a safe and spooky glow. Simple decorations like these can quickly transform your porch without much effort.
How Can I Decorate My Porch on a Budget?
To decorate your porch on a budget, use items you already have at home, like old clothes for scarecrows or recycled jars for lanterns. Dollar stores often carry affordable Halloween decorations. DIY projects, such as making ghost figures from white sheets and black paper, are cost-effective and fun to create.
How Do I Make My Halloween Decor Safe for Kids?
To make your Halloween decor safe for kids, avoid using real candles and opt for battery-operated ones. Ensure decorations are securely fastened to prevent them from falling. Choose non-toxic materials and avoid sharp objects. Make sure walkways are clear to prevent tripping hazards.
What Are Some Eco-Friendly Halloween Decoration Ideas?
Eco-friendly Halloween decoration ideas include using natural materials like pumpkins, gourds, and hay bales. Reuse old decorations and make DIY items from recycled materials. Solar-powered lights and biodegradable decorations are also great eco-friendly options. Consider composting pumpkins and other organic decorations after Halloween.
How Early Should I Start Decorating for Halloween?
It’s generally a good idea to start decorating for Halloween in early October. This gives you plenty of time to set up and enjoy your decorations. If you have a busy schedule, start with a few simple decorations and add more as Halloween approaches. Check the weather forecast to ensure your decorations will hold up throughout the month.
How Can I Make My Halloween Decorations Weatherproof?
To make your Halloween decorations weatherproof, use materials that are designed for outdoor use. Apply a clear waterproof sealant to items like wooden signs and painted decorations. Secure lightweight items with extra tape or adhesive to prevent them from blowing away. Store delicate decorations indoors during heavy rain or strong winds.
Can I Reuse Halloween Decorations for Other Holidays?
Yes, many Halloween decorations can be reused for other holidays with a bit of creativity. For example, string lights can be used for Christmas, and pumpkins can be decorated for Thanksgiving. Neutral decorations like hay bales and fall leaves can transition from Halloween to autumn decor. Consider investing in versatile items that can be repurposed throughout the year.
What Are the Best Lighting Options for Halloween Decorations?
The best lighting options for Halloween decorations include LED string lights, battery-operated candles, and solar-powered lights. These options are safe, energy-efficient, and easy to use. Spotlights can highlight specific decorations, while colored lights add an extra spooky effect. Glow sticks are also a fun and affordable way to add light to your decorations.
How to Involve Kids in Halloween Decorating?
Involving kids in Halloween decorating can be a fun family activity. Let them help with simple tasks like painting pumpkins, hanging decorations, and arranging props. You can also create DIY projects together, such as making ghost figures or paper bats. Ensure tasks are age-appropriate and supervise any activities involving tools or adhesives.
What Are Some Scary Yet Kid-Friendly Decor Ideas?
Scary yet kid-friendly decor ideas include using playful elements like friendly ghost figures, cartoonish skeletons, and smiling jack-o’-lanterns. Avoid overly frightening or gory decorations. Use bright colors and fun themes, like a witch’s cauldron with glowing lights or a cute scarecrow. Incorporate interactive elements, like motion-activated props that make silly sounds instead of scary noises.
How Do I Store Halloween Decorations After the Holiday?
To store Halloween decorations after the holiday, organize items by category and pack them in labeled plastic bins or storage boxes. Wrap delicate items in bubble wrap or tissue paper to prevent damage. Store decorations in a cool, dry place to avoid moisture and temperature extremes. Consider using clear bins for easy identification and access next year.
Where Can I Find Inspiration for Halloween Decorations?
You can find inspiration for Halloween decorations from a variety of sources, including Pinterest, home decor magazines, and Halloween-themed websites. Social media platforms like Instagram and Facebook often feature creative ideas and DIY projects. Visiting local Halloween stores and attending community events can also spark new ideas. Don’t be afraid to mix and match different styles to create a unique look for your porch.
Conclusion
Decorating your porch for Halloween can be a fun and creative activity that enhances the festive atmosphere of your home. From spooky skeletons and eerie eyeball bushes to glowing jack-o’-lanterns and ghostly figures, there are countless ways to transform your porch into a Halloween masterpiece. Whether you prefer a creepy, haunted look or a more playful and kid-friendly theme, the ideas outlined in this post offer something for everyone.
By following the detailed instructions and tips provided for each decoration, you can easily create a memorable and impressive Halloween display. Additionally, the frequently asked questions section offers helpful advice on making your decorations safe, durable, and budget-friendly.
As you prepare for the Halloween season, remember to have fun and let your creativity shine. Happy decorating and have a spooky, fun-filled Halloween!