You’re about to discover the secret to propagating plants like a pro – air layering. This technique allows you to induce roots to form on a branch while it’s still attached to the parent plant, giving you a brand new plant.
By following a few simple steps, you’ll be on your way to multiplying your favorite plants. But before you start, you’ll need to choose the right plant material, gather your tools, and prepare the mother plant.
Let’s get started, and soon you’ll be enjoying a thriving new plant, but first, you’ll need to…
Key Takeaways
- Select stems with a diameter of 1-2 inches, balancing hardness and flexibility, and consider the plant’s genetics and desirable traits.
- Make a small incision on the stem, about one-third of the diameter, using a sharp, sterile knife, avoiding deep cuts.
- Apply rooting hormone powder to stimulate cell division and promote root growth, using the correct amount to avoid inhibiting development.
- Pack moist, well-draining mix around exposed roots, maintaining proper moisture levels, and wrap with breathable material to maintain humidity.
- Provide indirect light, stable temperatures, and suitable conditions for optimal root development, regularly inspecting for progress and maintaining realistic expectations.
Choosing the Right Plant Material
When selecting plant material for air layering, focus on stems with a diameter of at least 1-2 inches, as they typically produce more robust roots and increase the chances of successful propagation.
You’ll want to choose stems with a good balance of hardness and flexibility, as these will be more receptive to rooting. Consider the plant’s genetics, too – some varieties are naturally more amenable to air layering than others.
Look for plants with a history of producing adventitious roots, such as figs or pomegranates. When it comes to variety selection, opt for plants with desirable traits like disease resistance or improved yield.
By choosing the right plant material, you’ll be setting yourself up for success in the propagation process. Remember, the quality of your starting material will directly impact the quality of your propagated plants.
Take your time, and don’t be afraid to experiment with different varieties to find the ones that work best for you.
Gathering Necessary Materials and Tools
What tools and materials will you need to gather to successfully air-layer your chosen plant material? As a gardener, you know that having the right tools and materials is essential for a successful propagation.
Start by assembling your gardening essentials, including a reliable pruning kit, sharp and clean pruning shears, and a dedicated tool organization system to keep everything within reach. You’ll also need plant labels to identify the different specimens and track their progress.
A soil tester will come in handy to determine the pH levels and nutrient content of your soil. For larger plants, a garden cart can be a lifesaver, allowing you to transport them with ease. If you’re working with multiple plants, consider investing in an irrigation system to make sure consistent watering.
Preparing the Mother Plant
With your toolkit assembled, you can now focus on preparing the mother plant, a critical step in air-layering that demands careful attention to the plant’s health and structure.
The mother plant’s soil health is vital, so inspect the soil for signs of nutrient deficiency or waterlogging. Make sure the soil is well-draining and has adequate plant nutrition to support healthy growth.
Prune the plant to promote bushy growth and encourage roots to develop near the surface. This will increase the chances of successful air-layering. Pruning techniques, such as tipping or stopping, can be used to control the plant’s height and promote branching.
Remove any weak or diseased branches, as these can weaken the mother plant and reduce the chances of successful propagation. By preparing the mother plant, you’ll be creating an ideal environment for air-layering to occur.
A healthy mother plant is essential for producing strong, vigorous roots that will support the new plant.
Selecting the Right Location
When selecting the right location on your mother plant for air layering, you’ll want to identify a section with a healthy, vigorous branch that’s around 1-2 inches in diameter. This ideal branch should have at least two nodes, which will enhance the chances of successful rooting.
Ideal Branch Selection
At the junction of a stem and a branch, where the plant’s transporting tissues are most active, you’ll typically find the ideal location for air layering. This area, known as the ‘node,’ is where the branch meets the stem, and it’s here that the plant’s vascular tissues are most concentrated.
When selecting a branch for air layering, look for areas with a high concentration of nodes, as these will provide the best opportunity for roots to develop.
When evaluating potential branches, consider the branch anatomy. Look for branches with a diameter of around 1-2 inches, as these will provide the necessary energy for root development. Avoid taking layers from weak or damaged branches, as these may not have the necessary energy reserves to support root growth.
Pruning techniques can also play a role in selecting the ideal branch. By pruning the branch to about 6-8 inches from the node, you can encourage the plant to focus its energy on root development.
Prune for Air Access
To ensure successful air layering, you’ll need to prune the selected branch to create a small, ring-shaped gap in the bark, about 1-2 inches above the node, allowing air to access the area where roots will develop. This vital step enables the formation of air pockets, which facilitate root growth.
Employ precise cutting techniques to remove a thin layer of bark, taking care not to damage the plant’s vascular tissue. Expose the cambium layer, a thin, light-colored area beneath the bark, which is responsible for plant growth. Pruning methods should be gentle yet deliberate, as excessive cutting can hinder foliar growth.
Make clean cuts, angled slightly downward to prevent water from collecting in the gap. This precise pruning technique will create an ideal environment for roots to develop, increasing the chances of successful air layering.
Node Identification
Identify the node, a slight swelling on the stem, usually accompanied by a leaf scar, as the optimal location for air layering, as this area is rich in growth hormones that stimulate root development. Nodes are essential in plant anatomy, serving as junctions where stems and branches meet. Familiarize yourself with node anatomy to pinpoint the perfect spot for air layering.
As you inspect the stem, look for the slight bulge, which indicates a node. You’ll often find a leaf scar or a slight change in stem coloration nearby. These areas are rich in auxins, hormones that promote root growth. Selecting the right node is crucial, as it will increase the chances of successful air layering.
When selecting a node, consider the stem segments above and below it. Make sure the segment above the node is at least 6-8 inches long, allowing for sufficient foliage to support the new roots. The segment below the node should be around 1-2 inches long, providing a sturdy base for the new roots to develop. By identifying the correct node and preparing the stem segments, you’ll be well on your way to successful air layering.
Making the Incision
Carefully, you’ll make a small incision about one-third of the way through the stem, just above a node, using a sharp, sterile knife or pruning tool. This precise cut will stimulate root growth and promote healthy air layering.
When making the incision, use a gentle, sawing motion to avoid applying excessive pressure, which can damage the stem. The ideal incision depth should be about one-third to one-half of the stem’s diameter. Cutting too deeply can cause the stem to weaken, making it prone to breakage.
To achieve the best incision, employ a gentle, controlled cutting technique. This will help minimize damage to the stem and surrounding tissues. For thicker stems, you may need to make multiple small incisions, gradually increasing the depth to achieve the desired level.
Applying Root Hormone Powder
Now that you’ve made the incision, it’s time to apply root hormone powder to stimulate root growth.
You’ll want to carefully sprinkle the powder onto the exposed stem, making sure to cover the entire area evenly.
Root Hormone Application
It’s crucial to apply root hormone powder to the exposed stem area, ensuring to coat it evenly to stimulate root growth. This powder contains specific hormone types that promote root development and increase root strength.
When applying the powder, gently sprinkle it onto the stem, making sure to cover the entire area evenly. Following the manufacturer’s instructions for the recommended amount to use is vital, as excessive powder can be detrimental to root growth.
When selecting a root hormone powder, consider the type of hormone it contains. Auxins, such as indole-3-butyric acid (IBA), are commonly used to stimulate root growth. Other hormone types, like cytokinins, can also be used in combination with auxins to enhance root development.
Hormone Powder Benefits
By applying root hormone powder correctly, you can greatly enhance the chances of successful air layering, and it’s the benefits of this powder that make it a valuable tool in plant propagation.
When you apply root hormone powder, you’re providing the cutting with a concentrated dose of auxins, which are essential for stem induction and cell division. This boosts the cutting’s ability to develop roots, increasing the likelihood of successful propagation.
The powder stimulates cell division, promoting the growth of new roots and shoots, and strengthens the stem, making it more resilient to environmental stressors. By promoting healthy cell division, you’re giving your cutting the best possible start in life, increasing its chances of thriving.
With root hormone powder, you can expect faster rooting, stronger roots, and healthier plants overall. By incorporating this powder into your air layering technique, you’ll be well on your way to propagating healthy, vibrant plants that will flourish under your care.
Optimal Powder Amount
When applying root hormone powder, it’s important to use the best amount to avoid overwhelming the cutting, as excess powder can inhibit root development. You want to provide just the right amount of stimulation to promote healthy root growth. The most suitable powder amount will vary depending on the specific product and plant species you’re working with, so be sure to follow the manufacturer’s instructions.
A general rule of thumb is to use a powder ratio of 0.1-1.0% of the cutting’s weight. For example, if your cutting weighs 10 grams, you’d use 0.1-1.0 grams of powder.
To achieve exact measurements, use a digital scale to weigh out the powder. You can also use a small measuring spoon or scoop to approximate the correct amount.
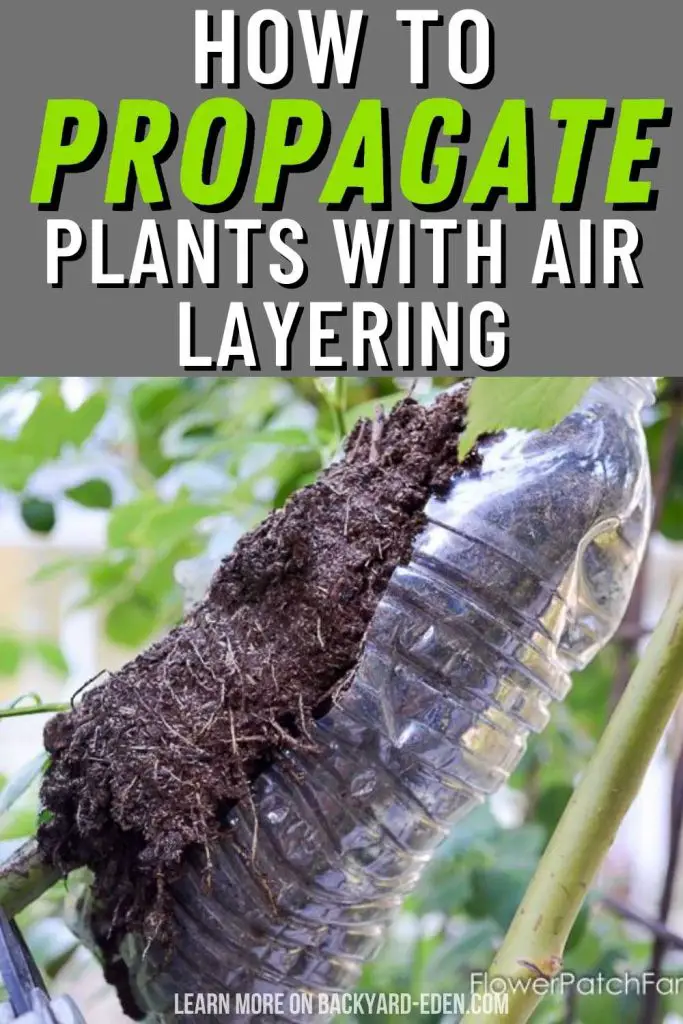
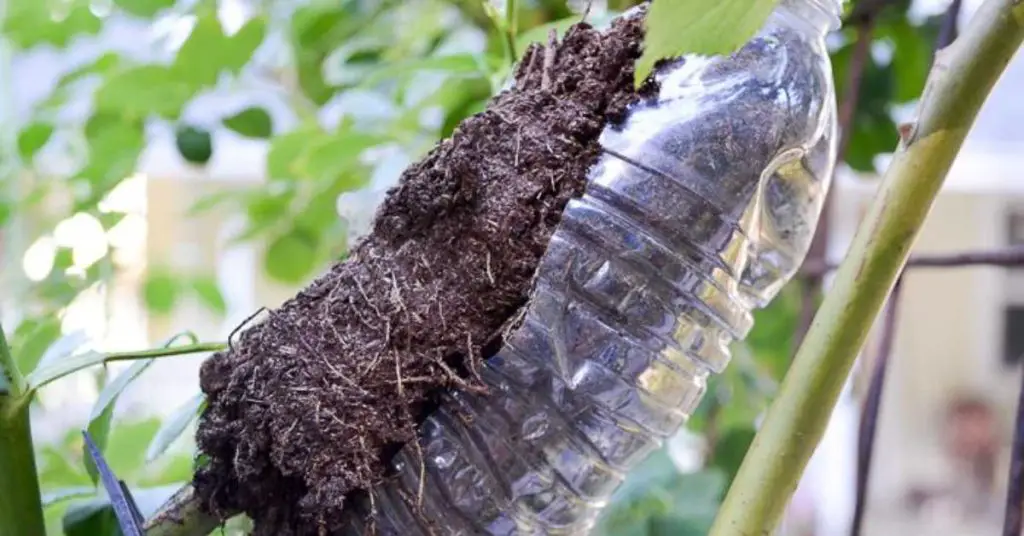
Packing the Rooting Medium
Carefully pack the rooting medium, a moist, well-draining mix specifically designed for air layering, around the exposed roots. Gently firm it in place to secure the roots and prevent settling. You want to achieve the right balance of moisture levels and soil density to promote healthy root development.
Make sure the mix is damp but not waterlogged, as excess moisture can lead to root rot. As you pack the medium, gently firm it in place to prevent settling and guarantee good contact between the roots and the medium. Aim for a consistent soil density that allows for adequate aeration and water penetration.
Avoid over-packing, which can compact the medium and hinder root growth. By getting the rooting medium just right, you’ll create an ideal environment for roots to form and thrive.
Securing the Rooting Area
You’ll need to secure the rooting area by wrapping a layer of moist, breathable material, typically a clear plastic wrap or a specialized air-layering bag, around the packed rooting medium to maintain humidity and protect the developing roots from drying out. This will guarantee a consistent, moist environment that fosters healthy root growth.
Make sure to apply a tight wrap, but not so tight that it constricts the stem or prevents water and air from reaching the roots. A tight wrap will help maintain humidity and prevent the rooting medium from drying out. As you wrap, gently press the material against the rooting medium to eliminate any air pockets. This will ensure that the roots develop in a stable, moist environment, promoting healthy growth and increasing the chances of successful propagation.
Caring for the Air Layer
Regularly inspect the air layer for signs of root development, such as a slight swelling or softening of the stem, and maintain a consistent moisture level to promote healthy root growth.
You’ll want to guarantee the moss or medium surrounding the air layer remains consistently moist, but not waterlogged. Check the moisture levels daily, and mist with water as needed to maintain ideal humidity.
Temperature control is also essential, as most plants prefer daytime temperatures between 65-75°F (18-24°C) and nighttime temperatures around 55-65°F (13-18°C). Avoid placing the air layer in direct sunlight, which can cause the stem to dry out and hinder root development.
Instead, provide bright, indirect light to promote healthy growth. By maintaining a stable environment, you’ll create perfect conditions for roots to develop and thrive.
Waiting for Roots to Develop
As you patiently wait for roots to develop, keep in mind that this stage can take anywhere from several weeks to several months, depending on the plant species, environmental conditions, and your air layering technique. During this time, it’s important to maintain ideal conditions for root growth, such as consistent moisture, adequate light, and suitable temperatures.
Regular Root Observation is essential to monitor progress and identify any potential issues. Check the air layer regularly, gently removing any moss or wrapping material to inspect the roots. You may start to notice white, fuzzy roots developing, which is a positive sign.
It’s essential to have realistic Timeframe Expectations to avoid disappointment. Remember that different plants have varying growth rates, and some may take longer to develop roots than others. Be patient, and don’t be discouraged if you don’t see immediate results.
With proper care and attention, your air-layered plant will eventually develop a robust root system, paving the way for a healthy, thriving new plant.
Separating the New Plant
With the roots fully developed, carefully sever the stem below the air layer, about one inch from the node, using a sharp, sterile tool to minimize damage and prevent infection. This separation technique is essential to guarantee the new plant’s independence from the mother plant.
Make a clean cut, angled slightly to promote water runoff and prevent waterlogging. Gently twist or rock the stem back and forth to loosen any remaining connections. Be cautious not to damage the delicate roots or disturb the surrounding soil.
Once separated, inspect the new plant for any remaining roots or stem fragments from the mother plant. Remove any debris or weak growth to encourage healthy development. This step is critical in promoting plant independence and preventing competition for resources.
You should now have a self-sustaining new plant, ready for the next stage of its life. By mastering this separation technique, you’ll be rewarded with a thriving, healthy plant that will flourish under your care.
Potting the New Plant
Now that you’ve successfully separated the new plant, it’s time to pot it up.
You’ll need to select a well-draining potting mix that meets the specific soil needs of your plant, and consider adding a balanced fertilizer to support its growth.
As you settle your new plant into its new home, be sure to water it thoroughly and maintain a humid environment to guarantee a smooth shift.
Soil and Fertilizer Needs
You’ll need a well-draining potting mix specifically designed for tropical plants, as air-layered cuttings require a slightly acidic to neutral soil pH, ranging from 6.0 to 7.0, to thrive. This pH range allows for ideal nutrient uptake and supports healthy root development. When selecting a potting mix, look for products labeled as ‘tropical’ or ‘acid-loving’ to guarantee the correct pH.
For fertilization, you can use balanced, water-soluble fertilizers with a ratio of 20-20-20 (nitrogen-phosphorus-potassium). You can also opt for organic, slow-release fertilizers that provide nutrients over an extended period. Avoid over-fertilizing, as this can cause more harm than good. Start with a half-strength solution and adjust as needed based on your plant’s response.
Remember to repot your air-layered cutting in a pot that’s only slightly larger than the root system. This will prevent the soil from becoming too wet and reduce the risk of root rot.
Watering and Humidity
Proper watering and humidity control are crucial when potting your newly air-layered plant, as this critical period sets the stage for its future growth and development. You’ll want to create a misty atmosphere, reminiscent of foggy mornings, to encourage healthy root growth.
Water your plant when the top inch of soil feels dry to the touch, taking care not to overwater. A good rule of thumb is to water only when the plant needs it, rather than on a fixed schedule.
To maintain ideal humidity, you can cover the pot with a clear plastic bag or a cloche. This will create a microclimate that retains moisture and warmth. However, be sure to remove the covering periodically to prevent fungal diseases.
Monitor the soil moisture and adjust your watering schedule as needed. By striking the right balance between water and humidity, you’ll give your air-layered plant the best chance to thrive.
As you nurture your plant, you’ll be rewarded with strong, healthy growth and a sense of belonging to the natural world.
Aftercare and Maintenance
As you carefully remove the air-layered plant from its parent, inspect the roots and stems for any signs of damage or weakness, making adjustments as needed to guarantee a successful shift. This critical aftercare phase safeguards your newly propagated plant establishes a strong foundation.
Establish a watering schedule that caters to your plant’s unique needs. Start with frequent, gentle watering to settle the roots, gradually increasing the interval as the plant matures. Monitor soil moisture levels to avoid overwatering, which can lead to root rot.
Maintain ideal humidity levels between 50-70% to promote healthy growth. You can achieve this by placing the pot on a tray filled with water and pebbles or using a humidifier. This controlled environment will help your plant thrive.
Regularly inspect your plant for signs of pests, disease, or nutrient deficiencies. Prune any dead or damaged leaves to prevent the spread of disease and encourage healthy growth.
Frequently Asked Questions
Can Air Layering Be Used to Propagate Succulents and Cacti?
You’ll face succulent challenges when air layering, as these plants store water in leaves and stems, making it tricky to induce roots; however, some cacti varieties, like prickly pear, can be successfully propagated using this method.
How Often Should I Mist the Rooting Area to Prevent Drying Out?
When misting the rooting area, you’ll want to maintain ideal humidity levels, ensuring moisture retention. Aim to mist every 2-3 days, or when the soil feels dry to the touch, to prevent drying out and promote healthy root growth.
What Are the Signs of Root Rot in an Air-Layered Plant?
You’ll notice root rot in your air-layered plant when you spot soft, mushy stems, a sour smell, or white fungal growth. Check for root decay by gently removing the moss or wrap, and inspect for soft, blackened roots.
Can I Use a Clear Plastic Bag Instead of Moss to Cover the Roots?
When exploring root coverage options, you’re wondering if a clear plastic bag can replace moss; while it’s possible, be aware that bags can trap moisture, leading to rot, whereas moss allows for air exchange, making it a better alternative to plastic wrap alternatives.
How Long Does It Take for an Air-Layered Plant to Produce New Growth?
As you wait for your air-layered plant to thrive, you’ll notice root development within 1-3 weeks, followed by new growth patterns emerging 2-6 weeks later, marking a promising start to your new plant’s life.
Conclusion
You’ve successfully air-layered a new plant. Make sure the soil is moist but not waterlogged, and provide indirect sunlight.
Fertilize sparingly, as the young roots are still developing. Monitor for pests and diseases, and prune as necessary.
With proper care, your new plant will thrive. Transplant it into a larger pot when the roots have filled the container, and enjoy the fruits of your labor.